博客

  • FCLGO | China to USA Ocean Freight Transit Times

    How Long Does Ocean Freight from China to USA Take?

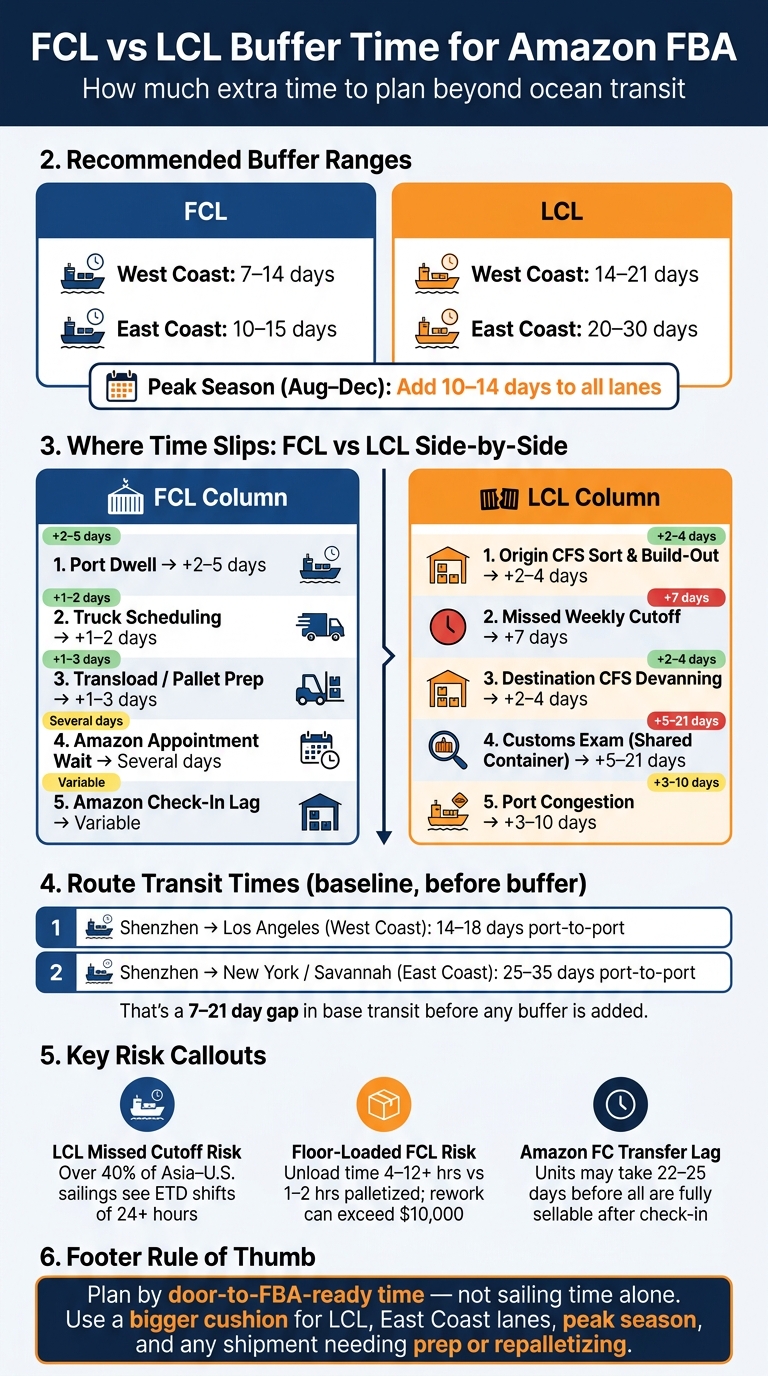
    If I plan ocean freight from China to the U.S., I don’t use the carrier’s sailing time alone. I use the full door-to-door range: about 24–45 days for FCL and 40–70 days for LCL, with East Coast shipments (such as ABE1 in Pennsylvania) often taking 10–15 more days than West Coast moves — common West Coast destinations include ONT8 (Ontario, CA) and LAX9 (Los Angeles).

    Here’s the short version:

    • Port-to-port is not the full timeline
    • FCL usually arrives sooner than LCL
    • West Coast routes usually take less time than East Coast routes
    • Customs, port release, drayage, and Amazon FBA appointments can add days or weeks
    • I should add a 5–10 day buffer for planning, and more during August–November and before Chinese New Year

    How long does it take to ship from China to the US?

    Quick Comparison

    Shipment Type West Coast Door-to-Door East Coast Door-to-Door Main Reason It Takes Longer
    FCL 18–35 days 28–45 days Port handling, customs, inland delivery
    LCL 25–40 days 40–55 days CFS consolidation and deconsolidation

    A few numbers matter most:

    • Origin handling in China: 3–7 days
    • Ocean transit to West Coast: 12–22 days
    • Ocean transit to East Coast: 25–35+ days
    • U.S. customs and port release: 1–3 days, or 5–7 days if examined
    • Final delivery: 1–5 days
    • Peak season delays: often +7 days to +2 weeks

    So if I’m restocking inventory or sending goods to Amazon FBA, I should plan from the in-stock date backward, not from vessel departure. That keeps the schedule grounded in what happens in the full shipping chain, not just on the water.

    Shipping Time by Route and Shipment Type

    FCL Transit Times From Major China Ports to US West and East Coast Ports

    Once you know the overall shipping range, the next step is figuring out which route gets there faster.

    That mostly comes down to the lane you choose. Shipments from China to West Coast ports usually arrive sooner. If you’re shipping to East Coast ports like New York/New Jersey, expect more time because the ocean leg is longer.

    Use the table below as a benchmark for common lanes. These are total timelines, not just time spent at sea.

    For Amazon FBA, a good planning range is about 20–30 days to West Coast centers and 35–45 days to East Coast centers.

    LCL Transit Times and Why LCL Usually Takes Longer

    LCL uses the same ocean routes as FCL, but the total timeline is longer. The reason is simple: there are more stops and more handoffs.

    At origin, LCL cargo goes to a Container Freight Station (CFS), where it waits to be grouped with other shipments before the container is sealed and sent to the port. After arrival in the U.S., that same container is moved to another CFS, unpacked, sorted, and then sent out for final delivery.

    There’s also a timing gap at cut-off. LCL cargo usually needs to reach the CFS 2–4 days before the vessel’s estimated departure. FCL cut-offs are often just 1–2 days before departure. So if you miss the weekly LCL consolidation window, you may have to wait for the next vessel.

    And because LCL is shared space, one company’s paperwork problem can hold up the whole container.

    That’s why LCL usually takes longer than FCL even when both move on the same route.

    FCL vs. LCL by Common China–USA Routes: Comparison Table

    The table below shows how transit ranges shift across common China–US lanes.

    Route FCL Port-to-Port FCL Door-to-Door LCL Port-to-Port LCL Door-to-Door Extra Days (LCL)
    Shanghai to Los Angeles 14–18 days 20–35 days 15–21 days 28–38 days 3–10 days
    Shenzhen to Los Angeles 14–18 days 20–30 days 17–25 days 28–38 days 3–10 days
    Ningbo to Seattle 15–20 days 25–35 days 18–24 days 30–40 days 5–7 days
    Shanghai to New York/New Jersey 25–35 days 35–50 days 32–42 days 45–60 days 5–10 days
    Shenzhen to Savannah 25–35 days 35–50 days 32–42 days 45–60 days 5–10 days

    Door-to-door times include origin handling, U.S. customs clearance, and final delivery.

    If your shipment is over 15 CBM, it’s smart to compare 20-foot FCL pricing with LCL. At that size, FCL often arrives faster and can come in at a similar or even lower total cost.

    Step-by-Step Timeline From Supplier Pickup to Final Delivery
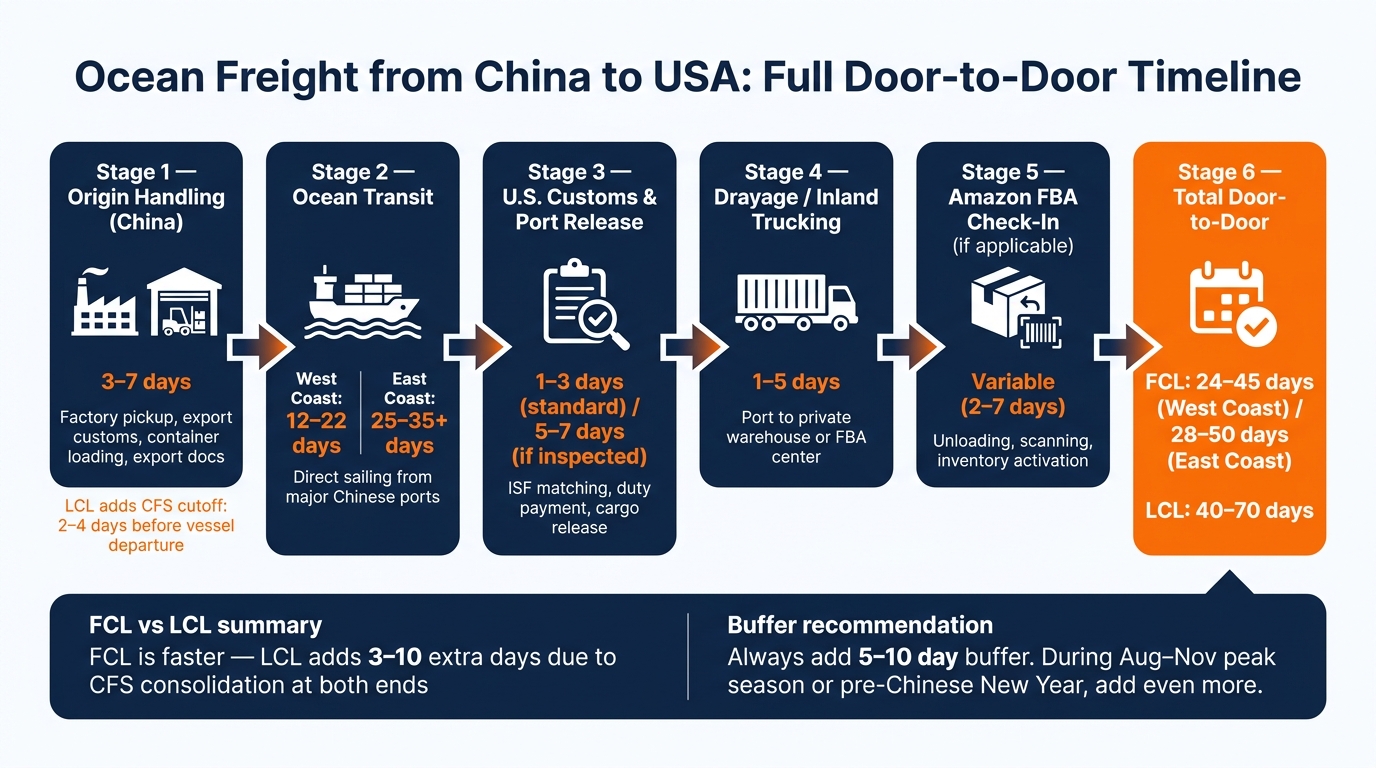
    Ocean Freight from China to USA: Full Door-to-Door Timeline

    Ocean Freight from China to USA: Full Door-to-Door Timeline

    The ranges above are total door-to-door estimates. This breakdown shows where the time actually goes.

    Origin Handling in China

    Origin handling in China usually adds 3–7 days before the vessel sails. That includes supplier pickup, container loading for FCL or delivery to a Container Freight Station for LCL, export paperwork, and Chinese customs clearance.

    For LCL, one timing issue matters a lot: the CFS cutoff. It’s usually 2–4 days before vessel departure. Miss that cutoff, and your cargo may wait for the next sailing.

    File the Importer Security Filing (ISF 10+2) early. It must be submitted to U.S. Customs at least 24 hours before the vessel departs China. If you miss that deadline, you can face $5,000+ in penalties and slower cargo release.

    Ocean Sailing, U.S. Customs, and Port Release

    Ocean transit usually takes 12–22 days to the West Coast and 25–35+ days to the East Coast.

    After the vessel arrives, U.S. Customs clearance and port release often take 1–3 days if your commercial invoice, packing list, bill of lading, and ISF filing are all in order. If CBP selects the shipment for an X-ray or physical exam, that can push the timeline to 5–7 days. And yes, that often means extra storage and labor charges too.

    Final Delivery to a Warehouse or Amazon FBA Center
    Amazon FBA

    Once the shipment clears the port, drayage and inland trucking to a private warehouse usually add 1–5 days.

    Amazon FBA adds one more step. Delivery to a fulfillment center needs a pre-scheduled appointment, and Amazon’s receiving and check-in process can add several more days before your inventory shows as available.

    Here’s how the full timeline stacks up:

    Shipping Stage Typical Duration What Happens
    Origin Handling 3–7 days Factory pickup, export customs, loading, export documentation
    Ocean Transit (West Coast) 12–22 days Direct sailing from major Chinese ports
    Ocean Transit (East Coast) 25–35+ days Sailing to East Coast ports
    U.S. Customs & Port Release 1–3 days (up to 5–7 days with exam) ISF matching, duty payment, cargo release
    Final Delivery / Drayage 1–5 days Trucking to warehouse or Amazon FBA center
    Amazon FBA Appointment and Check-In Variable Unloading, scanning, and inventory activation

    Add those stages together, and FCL door-to-door usually takes 20–50 days. LCL usually takes 30–70 days because of consolidation and deconsolidation at both origin and destination.

    These stages give you the baseline. The next part is what slows things down.

    What Speeds Up or Delays an Ocean Freight Shipment

    Route, Port, and Seasonal Factors

    Once you know the baseline transit time, the next thing to watch is what pushes that timing up or down. One of the biggest factors is which U.S. coast your shipment is heading to. West Coast ports usually land in the 12–20 day range, while East Coast ports are more like 25–35 days.

    Routing matters too. If your cargo goes on a transshipment route instead of a direct sailing, that can tack on 5–10 extra days. It’s the shipping version of taking a connecting flight instead of flying nonstop.

    Season timing can also throw things off fast. Peak season runs from August through November, and the period before Chinese New Year – usually January and February – often brings vessel congestion, blank sailings, and equipment shortages. In those windows, 7+ day delays are common. Booking 2–4 weeks in advance can help lower the odds of missing your planned sailing.

    Documentation, Customs, and Delivery Appointment Issues

    A lot of delays don’t happen on the water. They happen on paper.

    If your commercial invoice, packing list, and bill of lading don’t match, or your HTS codes are wrong, customs may hold the shipment. That can add 3–7 days, and in some cases it can even lead to seizure.

    And even after the cargo clears the port, the last leg can still slow you down. Busy Amazon fulfillment centers often need pre-scheduled delivery appointments, and a missed appointment window can add several more days.

    Common Delay Factors and Their Typical Time Impact: Comparison Table

    Use the table below to see how each delay affects transit time.

    Delay Factor Where It Occurs Typical Time Added What to Do
    Peak Season / Chinese New Year Entire route +1–2 weeks Book 2–4 weeks in advance
    Blank Sailings Origin port +7 days or more Build extra buffer time into your plan
    Direct vs. Transshipment Routing Ocean transit +5–10 days Choose direct service when lead time is tight
    Customs Inspection or HS Code Error US port / customs entry +3–10 days Verify HTS codes and ensure all documents match exactly
    Missed Consolidation Cutoff Origin +7–10 days Use FCL for shipments over 15 CBM
    Port Congestion US port +2–5 days Build in extra buffer time
    Amazon FBA Appointment Final mile +2–7 days Confirm warehouse appointments early
    Missing Required Certificates Destination port Multi-week delay at port Check FCC, CPSC, or EPA requirements before shipping

    These buffer days matter when you’re planning restocks and setting delivery dates. A shipment can look on time on paper, then slip by a week because of one missed cutoff or one customs issue.

    How to Plan Ocean Freight for Inventory Restocking and FBA Replenishment

    How to Work Backward From Your Target In-Stock Date

    The best way to build a shipping schedule is simple: start with the date your inventory needs to be available at your warehouse or Amazon FBA fulfillment center, then work backward from there.

    That means you don’t plan from the day the factory says it’s done. You plan from the day the stock must be live, then subtract each part of the trip.

    Use these stages to map out your shipment calendar:

    Phase FCL Time LCL Time
    Origin handling (China) 3–7 days 7–14 days
    Ocean transit (West Coast) 14–18 days 20–30 days
    Ocean transit (East Coast) 25–35 days 32–45 days
    US customs & port release 5–7 days 7–10 days
    Final delivery to FBA 2–5 days 3–7 days
    Total door-to-door 24–45 days 40–70 days

    You’ll also need to subtract production lead time before transit and delivery. And don’t skip the buffer. Add 5–10 days for customs holds, appointment changes, or carrier schedule shifts. During peak season, add even more.

    How FCLGO Reduces Handoffs and Timeline Risk
    FCLGO

    Every handoff in the shipping process creates one more place where things can slow down. Factory to trucker. Trucker to port. Port to customs broker. Customs broker to drayage carrier. It adds up fast.

    More handoffs usually means more room for delay, missed updates, or simple confusion.

    Once your schedule is in place, one of the biggest problems is avoidable handoff delay. FCLGO can handle pickup, booking, customs, drayage, and FBA prep in one workflow. That cuts down on handoff delays and helps keep shipments on schedule. With one coordinator managing the flow, it’s easier to avoid missed deadlines.

    Conclusion: The Transit Time Numbers Importers Should Use for Planning

    FCL door-to-door from China to the US West Coast typically runs 24–45 days; LCL runs 40–70 days. If you’re routing to the East Coast, plan for about 10–15 extra days compared with the West Coast.

    For day-to-day planning, the takeaway is pretty clear:

    • FCL is faster and more predictable than LCL
    • West Coast ports are quicker than East Coast ports
    • A carrier’s quoted transit time is not your full door-to-door timeline

    So if you’re planning a restock or an FBA replenishment, use the full lead time, not just the time on the water. That means production, origin handling, ocean transit, customs, and final delivery all need to be in the calendar. Then add a 5–10 day buffer so one delay doesn’t turn into a stockout or a missed launch window.

    FAQs

    How early should I book ocean freight from China?

    Book ocean freight as early as you can, especially when you’re working toward a hard deadline. Once your cargo details are set, lock in the booking. That gives you a better shot at securing space, since rates and carrier availability can shift.

    It also helps to plan for the entire move, not just the time on the water. That includes export operations, ocean transit, customs clearance, and inland delivery. With total door-to-door transit times often landing between 20 and 70 days, it’s smart to begin the booking process weeks before your target replenishment or launch date.

    When should I choose FCL instead of LCL?

    Choose FCL (Full Container Load) when your shipment is more than 15 cubic meters. It usually makes more sense for large, regular inventory restocks because the cost per cubic meter is lower, and transit is often faster.

    FCL can also cut handling risk. The container stays sealed from origin to destination, which means fewer touchpoints along the way. It also skips the extra port time that comes with LCL consolidation and deconsolidation.

    What is the safest buffer to add for Amazon FBA shipments?

    For Amazon FBA shipments, the safest buffer is at least two to four weeks beyond your estimated port-to-port transit time.

    Ocean transit to the U.S. West Coast usually takes 25 to 35 days. But that’s only the water portion of the trip. Origin handling, customs clearance, port congestion, and final trucking to Amazon fulfillment centers can all slow things down.

  • FCLGO | FBA Partial vs Split Shipments

    Partial vs Split Shipments for FBA

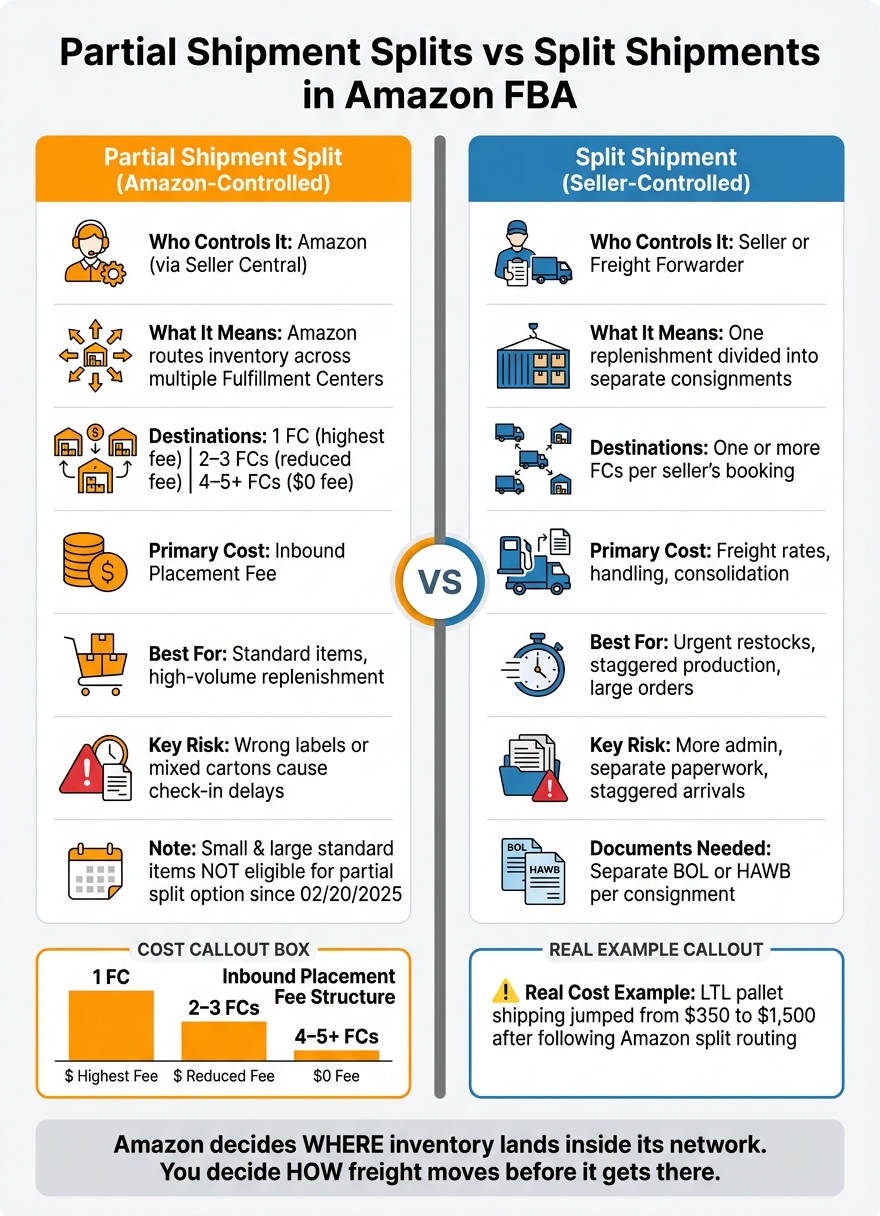
    These two terms are not the same, and mixing them up can cost you money. In Amazon FBA, a partial shipment split is Amazon’s inbound placement choice. A split shipment is your freight choice, like sending part by air and part by ocean.

    Here’s the short version:

    • Amazon controls partial shipment splits
    • You control freight split shipments
    • Amazon may route inventory to multiple fulfillment centers — for example, West Coast units often go to ONT8 or PHX7, while East Coast units may be directed to ABE1 or BFI1y to 1 FC, 2–3 FCs, or 4–5+ FCs
    • 1 FC usually means the highest placement fee
    • 2–3 FCs can mean a lower fee
    • 4–5+ FCs can mean $0 placement fee
    • Since 02/20/2025, small standard and large standard items are not eligible for the partial shipment split option
    • If cartons, labels, or Shipment IDs do not match Amazon’s routing, check-in can slow down if you don’t follow a step-by-step shipping guide
    • One seller reported LTL pallet shipping jumping from $350 to $1,500 after following Amazon’s split routing

    If I had to sum it up in one line, it would be this: Amazon decides where inventory goes inside its network, while I decide how the freight moves before it gets there.

    Partial Shipment Splits vs Split Shipments: Amazon FBA Guide

    Partial Shipment Splits vs Split Shipments: Amazon FBA Guide

    How To Get Amazon Optimized Shipment Splits – FBA Send to Amazon Flows

    Quick Comparison

    Point Partial Shipment Split Split Shipment
    Who controls it Amazon Seller or forwarder
    What it means Amazon places inventory across FCs I divide one replenishment into separate consignments
    Main cost Inbound placement fee Freight, handling, and paperwork
    Common use Lower Amazon placement cost Urgent air freight restocks, batch production, large orders
    Paperwork Shipment IDs and FBA labels Separate tracking and transport documents
    Main risk Wrong labels or mixed cartons More admin and separate arrivals

    So when I book freight, print labels, or plan replenishment timing, I need to treat these as two separate decisions. That’s the whole point of this article.

    How Partial Shipment Splits Work in Amazon FBA

    How Amazon Routes Inventory Across Fulfillment Centers

    Amazon gives sellers three inbound placement options in the Send to Amazon workflow. Each option sends inventory to a different number of fulfillment centers.

    Destinations Fee
    1 FC Highest fee
    2–3 FCs Reduced fee
    4–5+ FCs No fee ($0)

    Amazon decides placement based on product mix, inventory levels, customer demand, and FC capacity.

    After Amazon assigns those FCs, your part is pretty simple in theory: make sure each split is prepped right and each carton gets the right label. That’s where a lot of sellers trip up.

    Booking Steps After Amazon Assigns Multiple FCs

    Start by matching every Shipment ID to its FC code before you print labels. That matters because Amazon can assign separate Shipment IDs even when two splits are headed to the same FC.

    If you want the $0 option, there’s a strict rule: each SKU must ship in at least five identical cartons or pallets, with the same quantities and the same carton mix.

    One thing to keep straight: Amazon controls the placement split. The freight split is a separate piece.

    Receiving Timelines and Check-In Delays

    Each FC in a split receives and checks in inbound freight on its own timeline. So it’s normal for one destination to move ahead while another lags behind.

    Delays often happen when sellers mix split shipments together or use the wrong labels and Shipment IDs. In plain English, if the cartons don’t match the routing Amazon set, check-in can slow down fast.

    That’s Amazon-controlled routing, not seller-controlled freight planning.

    Split Shipments as a Freight Planning Tool for FBA

    Seller-controlled split shipments are a freight planning move. One replenishment goes out in two or more separate consignments. After Amazon assigns the destination FCs, the seller chooses how to divide the freight.

    When to Split One Replenishment Into Multiple Consignments

    The most common reason is stockout risk. Splitting a replenishment lets you send part of the inventory on a faster mode while the rest moves on a lower-cost option.

    Another common reason is large orders or staggered production. A supplier might finish goods in batches, or the purchase order may be too big for one load. In those cases, breaking the shipment into smaller consignments can make planning easier. The tradeoff is cost: multiple smaller consignments usually increase freight spend, so it makes sense to compare total landed cost before you commit to the split.

    Booking and Documentation Across Each Consignment

    Each consignment needs its own booking reference, label set, and transport documents. For LTL, that also means a separate Bill of Lading. Even when the goods are the same or headed to the same fulfillment center, Amazon treats each consignment as its own shipment. So each one must be labeled and prepped separately.

    A freight forwarder can handle the moving parts across both consignments, including air, ocean, customs clearance, warehousing, and delivery.

    How Staggered Consignments Affect Amazon Receiving

    When split consignments show up at different times, Amazon receives and processes each one on its own. If one consignment has different prep standards or missing paperwork, the later arrival is more likely to run into check-in delays. That’s why it helps to keep labels, carton prep, and shipment details the same across all consignments.

    Those shipment-level choices shape cost, booking workload, and receiving speed.

    Partial Shipment Splits vs Split Shipments: Direct Comparison

    Amazon controls inbound placement splits. You control freight splits. Once that line is clear, the main issue comes down to cost, control, and receiving speed.

    Who Controls the Split, Where Inventory Goes, and What It Costs

    Amazon splits mainly affect placement fees. Freight splits mainly affect freight spend, handling, and consolidation costs. For small and large standard items, sellers can choose between a single-FC split with a fee or an Amazon-optimized split to 4 or more FCs if the shipment qualifies. Amazon-optimized routing can remove the placement fee, but it can also push up your total shipping spend because you’re sending smaller loads to more destinations.

    Factor Amazon-Controlled Split Freight Split Shipment
    Controlled by Amazon via Seller Central Seller or freight forwarder
    Destinations Multiple FCs based on Amazon routing One or more FCs per your booking
    Primary cost Inbound placement fees Freight rates, handling, consolidation
    Best for Standard items and high-volume replenishment Urgent restocks and larger replenishments

    A simple way to think about it: Amazon decides where inventory lands inside its network, while you decide how freight moves before it gets there. That difference matters. One choice can trim placement fees. The other can help you time inventory flow with a lot more precision.

    Booking Steps, Tracking, and Receiving Complexity

    Amazon-controlled splits live inside Seller Central. Freight split shipments happen across separate bookings with your carrier or FBA prep and warehousing partner. That means more moving parts.

    Each freight consignment needs its own booking reference, transport documents, and tracking number – whether that’s a Bill of Lading for ocean freight or a House Air Waybill (HAWB) for air. If something breaks, gets delayed, or goes missing, you need to trace it back to the exact consignment, not just the Shipment ID.

    Step Amazon-Controlled Split Freight Split Shipment
    Booking Inside Seller Central workflow Separate bookings per consignment
    Documents Multiple Shipment IDs + FBA labels Multiple BOLs or HAWBs
    Tracking Integrated in Seller Central Managed via carrier or forwarder
    Receiving Each Shipment ID checked in separately Each consignment received independently

    In plain English: Amazon splits are easier to manage day to day. Freight splits give you more say, but they also bring more admin work. More bookings. More paperwork. More chances for one piece of the shipment to drift off schedule.

    Matching Each Option to Bulky Items, Urgent Restocks, and Large Orders

    The right split depends on SKU size, urgency, and total landed cost. You can use a CBM calculator to determine if your shipment volume justifies the extra freight spend.

    Bulky SKUs often work better with a minimal split. If sending inventory to several FCs drives freight spend above the placement fee, paying Amazon’s fee may be the cheaper move.

    Urgent restocks are where freight-level splits make a lot of sense. You can send a small portion by air while the rest moves by ocean. That helps prevent stockouts without forcing the whole order onto a higher-cost shipping mode.

    Large replenishment orders can fit either option. It depends on how the supplier ships and how much inventory you’re moving. If the order comes in batches, or if it’s too large for one load, a freight-level split lets you break it into separate consignments and control timing more closely.

    Conclusion: Pick the Right Split and Reduce Check-In Delays

    Partial shipment splits are Amazon inbound placement splits set up in Seller Central. Split shipments, on the other hand, are a freight planning move where one replenishment is divided into separate consignments. That distinction matters because the right split keeps Amazon routing, freight booking, and receiving documents lined up from origin to FC.

    The biggest problem is usually a mismatch. If Amazon assigns one routing path but the freight documents point to something else, issues can start fast. In most cases, check-in delays begin when labels, Shipment IDs, or paperwork don’t match Amazon’s routing.

    If you’re using Amazon inbound placement splits, there’s one last rule to follow: keep carton contents identical across the required cartons or pallets.

    For China-to-USA sellers, tighter coordination across freight, prep, customs, and delivery can cut down hand-off gaps. FCLGO offers end-to-end support for shipments moving from China to Amazon fulfillment centers.

    FAQs

    How do I know whether Amazon or I control the split?

    Amazon controls the exact split. In Seller Central, you can only pick from the inbound placement options Amazon shows you, such as Minimal, Partial, or Amazon-optimized splits.

    Which options you see depends on things like product type, shipment quantity, current network inventory, regional demand, and whether your shipment qualifies. In plain English, you can’t force a specific split.

    When is paying the placement fee cheaper than splitting to more FCs?

    Paying the inbound placement fee can be the lower-cost option when the extra logistics and shipping expense of sending inventory to several fulfillment centers ends up costing more than the fee itself.

    Amazon-optimized splits may get rid of the placement fee. But they can also drive up freight and handling costs. Before you book anything, compare the total inbound shipping cost for each option against the placement fee.

    What mistakes usually cause FBA check-in delays?

    FBA check-in delays usually come down to one thing: Amazon’s rules weren’t followed exactly.

    The most common problems are:

    • Incorrect or old FNSKU barcodes
    • Weak packaging that leads to damage or items shifting in transit
    • Cartons that go over Amazon’s weight limits: 50 pounds for standard items and 30 pounds for hazardous materials

    Other mistakes show up a lot too. Sellers sometimes mix different SKUs inside the same case-packed box, which can create problems at receiving. Another common issue is sending inventory to a fulfillment center that doesn’t match the routing Amazon assigned.

  • FCLGO | Amazon Pallet Labels & Stretch Wrap

    Amazon Pallet Labels And Stretch Wrap Guide

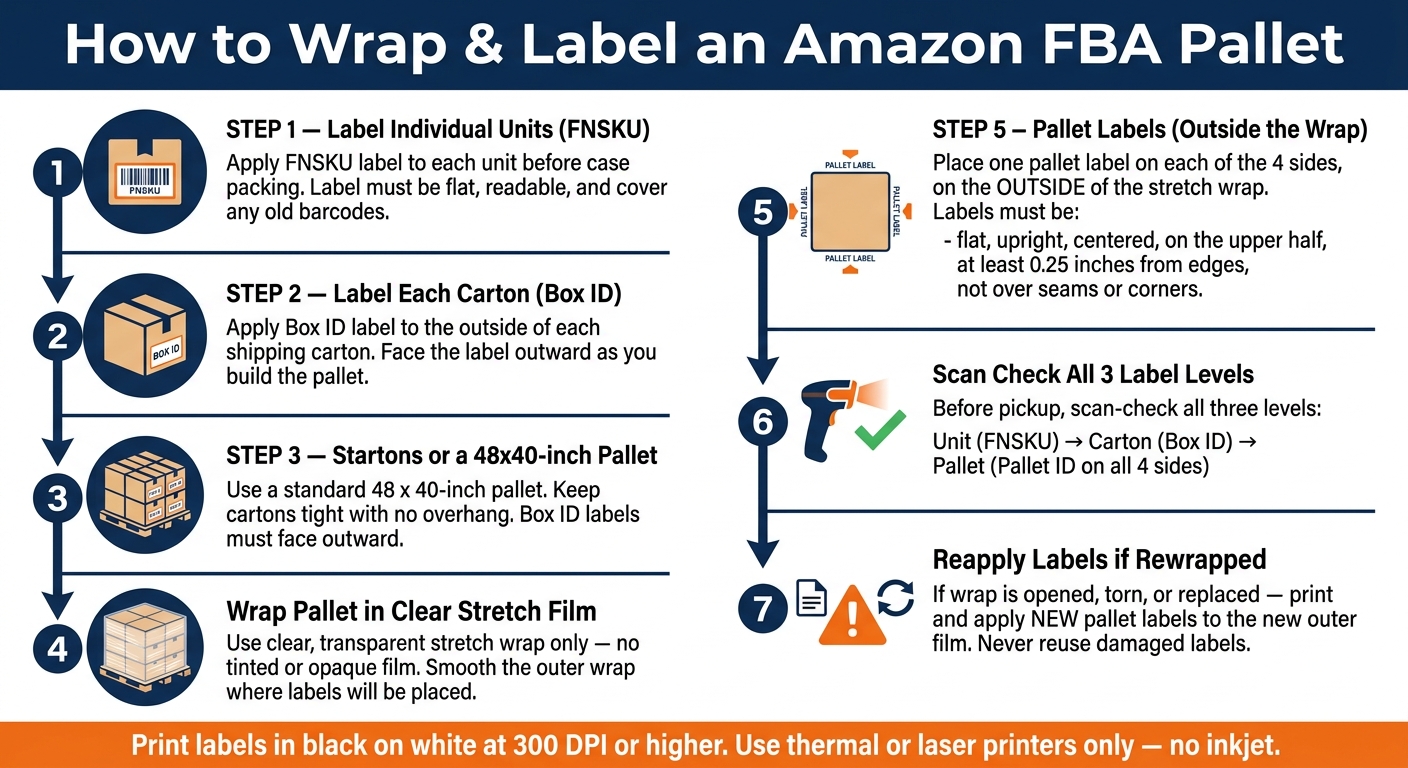
    If Amazon can’t scan your pallet fast, your shipment can get held up. The short version is simple: put FNSKU labels on each unit, Box ID labels on each carton, and 4 pallet labels on the outside of the clear stretch wrap – one on each side.

    Here’s what I’d check before a pallet leaves:

    • 3 label levels: unit, carton, and pallet
    • 4 pallet labels: one per side
    • Clear wrap only: no tinted or opaque film
    • Upper half placement: pallet labels should sit high enough to scan
    • Flat labels only: no corners, folds, seams, or wrinkles
    • Re-label after rewrapping: if the outer wrap changes, print and apply new pallet labels

    A few details matter a lot here. Amazon wants labels printed in black on white at 300 dpi or higher, with at least 0.25 inches of space from edges. The pallet label goes on after wrapping, while FNSKU and carton labels go on before palletizing. And if one side is missing a pallet label, or the barcode sits under bad wrap glare, receiving can slow down.

    I’d sum it up like this: label units first, cartons next, wrap the pallet, then add 4 pallet labels to the outside film and scan-check all 3 levels before pickup.

    Send to Amazon Step 5: Print Pallet Labels | Seller University

    Seller University

    Amazon pallet label and stretch wrap rules

    Getting pallet labels right comes down to placement and wrapping. If either one is off, Amazon fulfillment center teams may have trouble scanning the load when it arrives.

    Place pallet labels on all 4 sides, outside the wrap

    Once the label types are set, the next job is making sure the pallet label stays readable after the pallet is wrapped. Carton and FNSKU labels remain on the boxes and units. Pallet labels belong on the finished load.

    Place four pallet labels on the pallet, with one label on each side, squarely on the outside of the stretch wrap so forklift operators can see them and scan them at a glance. Don’t fold a label over a corner or edge, and keep it at least 0.25 inches away from any edge. It also helps to avoid spots with straps, seams, or crushed and uneven surfaces, since those can make labels harder to scan.

    Use clear stretch film and position labels on the upper half

    Label placement only works if the wrap itself doesn’t get in the way. Amazon requires clear, transparent stretch film. Tinted or opaque wrap can block barcode scans.

    Wrap the pallet first, then place the pallet labels on the outermost layer of the wrap. Put each label on the upper half of the load, high enough for teams to scan it without pulling or lifting the wrap.

    How to wrap and label a pallet, step by step

    Amazon FBA Pallet Labeling & Stretch Wrap: Step-by-Step Checklist

    Amazon FBA Pallet Labeling & Stretch Wrap: Step-by-Step Checklist

    Stack cartons so Box ID labels face outward

    Once you’ve set label placement, stack the cartons in a way that keeps every barcode easy to see. Use a 48 x 40-inch pallet. Keep cartons tight, with no overhang. The FNSKU stays on each unit, and the Box ID label stays on each carton.

    As you build the pallet, turn each carton so its Box ID label faces outward. That way, the label is still visible after the pallet is wrapped.

    Wrap the pallet first, then apply pallet labels

    Secure the load with clear plastic stretch wrap. Before you add labels, smooth the outer wrap anywhere a label will go. If the wrap is bunched up or creased, barcode scanners can struggle to read it.

    Then place one pallet label on each of the four sides. Each label should go on the outside of the stretch wrap, laid flat, kept upright, and centered on the side. This makes life easier for warehouse staff who need to scan the pallet fast.

    Reapply labels after damage, inspection, or rewrapping

    If the outer wrap gets opened, torn, or replaced, add new pallet labels to the new outside layer. Don’t reuse a damaged label.

    After rewrapping, do a quick scan check before shipment.

    How to keep FNSKU, carton, and pallet labels scannable

    Once the pallet is wrapped, do one last scan check at every label level. If a label won’t scan, receiving slows down. Most scan issues come from three things: weak print quality, poor placement, or barcodes getting covered.

    Avoid glare, wrinkles, and corner placement

    Use black ink on white, non-reflective labels at 300 dpi or higher. Stick with thermal or laser printers. Inkjet printers can smudge or fade, and Amazon does not allow them for FBA labels.

    When you print label PDFs, set printer scaling to "None" or "100%". If the file gets scaled, the barcode can warp and fail to scan.

    Amazon rejects labels that are smudged, reflective, curved, or wrapped around a corner. Keep each label on a flat, smooth area. Don’t place labels over seams, folds, corners, or edges. You also need enough empty space around the barcode: at least 0.25 inches of quiet zone on the left and right, and 0.125 inches on the top and bottom.

    Check every label level before the shipment leaves

    Before the shipment goes out, check all three label levels. Start at the unit, then the carton, then the pallet.

    Label Level What to Check When to Check
    Unit (FNSKU) Readable, flat, no old barcodes showing Before case packing
    Carton (Box ID) Facing outward, not over a seam After palletizing
    Pallet (Pallet ID) Scannable on all 4 sides, outside the wrap After stretch wrapping

    Full pallet prep workflow for China-to-USA FBA shipments

    Once label placement is set, the next step is the full prep flow from unit to pallet. For China-to-USA FBA shipments, apply labels in this order: unit labels first, carton labels next, pallet labels last. That order helps you avoid rework after the load is wrapped.

    Where each label type is applied in the workflow

    Apply FNSKU labels to individual units, Box ID labels to cartons, and pallet labels only after stacking and stretch wrapping are done. If carton labels are missing once the pallet is sealed, you’ll need to break down the load and fix it.

    Label Type Applied At
    FNSKU Individual unit
    Carton (Box ID) Outside of each shipping box
    Pallet ID All 4 sides, outside stretch wrap

    This sequence matters even more on China-to-USA shipments, where every handoff needs clear, visible labels.

    How FCLGO can support compliant pallet prep and delivery

    FCLGO

    For shipments moving from China to Amazon fulfillment centers, using one prep process helps keep labeling consistent all the way through delivery. FCLGO can handle:

    • FNSKU labeling
    • Carton labeling
    • Palletizing
    • Clear stretch wrapping
    • Final Amazon-bound delivery from China to the U.S.

    It also supports customs clearance, U.S. warehousing, trucking, and direct delivery to Amazon fulfillment centers.

    Conclusion: Key rules to prevent scan and receiving problems

    Before pickup, do one last check. Keep each carton labeled, wrap the pallet in clear stretch film, and place four pallet labels on the outside of the wrap. Each label should be centered on the upper half of a different side. Then make sure every label is flat, easy to see, and scannable.

    If the pallet gets inspected, damaged, or rewrapped, add new pallet labels to the new outer film. Don’t reuse damaged labels. Print new pallet labels instead.

    Receiving problems usually happen for a few simple reasons: labels are covered by wrap, a label is missing from one side, or one pallet has mixed shipment IDs.

    FAQs

    Can pallet labels go under stretch wrap?

    Pallet labels must go outside the clear stretch wrap so Amazon fulfillment center teams can scan them without trouble.

    Place FBA pallet labels on all four sides of the pallet, in the top center of each side. You should also add a clear note such as "Do Not Break Down" or "Do Not Break Stretch Wrap".

    What happens if I rewrap the pallet?

    If you rewrap a pallet, apply four new FBA pallet labels to the outside of the new stretch wrap. Don’t reuse or photocopy old labels, because each pallet label is linked to a specific shipment.

    Place the new labels at the top center on all four sides of the pallet. Make sure each one stays easy to see and easy to scan.

    Do FNSKU and Box ID labels still need to show after wrapping?

    Yes. Apply FNSKU and Box ID labels before you stack cartons and stretch-wrap the pallet.

    Why? Amazon checks in inbound freight with box-level scanning. Once the pallet is sealed, you can’t add those labels afterward.

    A couple of things matter here:

    • Keep carton labels visible on the outside of each carton.
    • Place pallet labels on the outside of the final stretch wrap on all four sides so Amazon can scan them.

  • FCLGO | Amazon FBA Carton Shipping Marks Guide

    Carton Shipping Mark Requirements For Amazon FBA

    If one carton label is wrong, Amazon can slow or stop receiving for the whole shipment. This is especially critical when shipping to high-volume centers like ONT8, ABE1, or BFI1.

    I’d boil this article down to four points: use the right Amazon labels, print the right carton marks, place labels where scanners can read them, and remove old barcodes before pickup. For many sellers, the biggest risks are duplicate Box IDs, missing country-of-origin marks, bad label placement, and cartons that do not match the shipment plan.

    Before freight leaves China, when using Amazon FBA shipping from China, I’d check these items on every master carton:

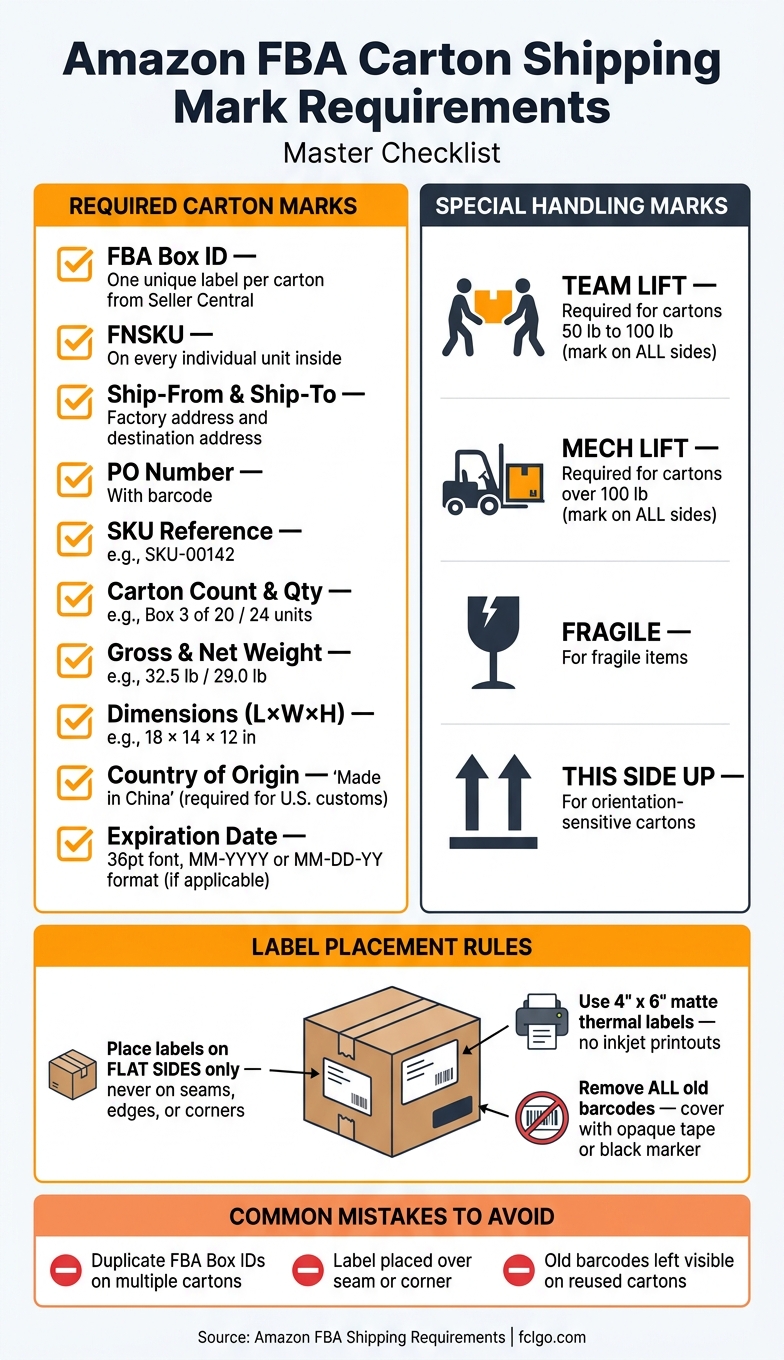
    • 1 FBA Box ID per carton from Seller Central
    • FNSKU on each unit
    • Ship-from and ship-to details
    • PO number, SKU, carton count, weights, and dimensions
    • “Made in China” on each carton for U.S. customs
    • Expiration date in large print if the product is date-sensitive
    • “Team Lift” for 50 lb to 100 lb cartons
    • “Mech Lift” for cartons over 100 lb
    • No old labels or old barcodes showing
    • Labels on a flat side, not on seams, edges, or corners

    A simple mistake can turn into relabeling fees, storage charges, or redelivery costs. So if I want fewer receiving problems, I’d treat carton marking as a final pre-shipment check, not a last-minute task.

    That’s the full picture in plain English: the carton needs freight marks, Amazon box labels, clean placement, and a final inspection before it ships.

    Amazon FBA Carton Shipping Mark Requirements Checklist

    Amazon FBA Carton Shipping Mark Requirements Checklist

    How To Prepare Your Carton Labelling For Amazon FBA for Imported Goods from China to USA UK CA AU

    What to Put on Each Master Carton for Amazon FBA

    Every master carton needs two things: the FBA Box ID and the shipping marks used by Amazon, carriers, and customs as part of the shipping process to Amazon FBA.

    Amazon-Required Carton Identifiers

    Print one unique FBA Box ID label on every carton from Seller Central. That label needs to match the shipment plan exactly.

    Standard Carton Shipping Mark Fields

    Once the Box ID is handled, add the carton details that Amazon, carriers, and customs look for.

    Field Example
    Case packed marking, if applicable Case Packed
    Ship-from / ship-to addresses and consignee Factory address / Destination address / ACME Brands
    PO number (with barcode) PO 123456
    SKU reference SKU-00142
    Carton number / total cartons and quantity per carton Box 3 of 20 / 24 units
    Gross weight / Net weight 32.5 lb / 29.0 lb
    Dimensions (L × W × H) 18 × 14 × 12 in
    Country of origin Made in China

    For U.S. customs, mark each carton "Made in China". If the products have expiration dates, print the expiration date on every master carton in 36-point type or larger using MM-YYYY or MM-DD-YY format.

    Handling and Compliance Marks for Special Cartons

    If a carton weighs 50 lb to 100 lb, mark it "Team Lift" on all sides. If it weighs more than 100 lb, mark it "Mech Lift" on all sides. For cartons that need extra care, add "Fragile" and "This Side Up".

    After you print the required marks, place them where they stay easy to see and easy to scan.

    Where and How to Place Carton Marks and Labels

    Once the carton data is printed, label placement and Amazon FBA prep services decide whether Amazon can scan the box at receiving.

    Where to Place FBA Box ID and Carrier Labels

    Put every label on a flat side of the carton. Don’t place it over a seam, edge, or corner.

    For SPD shipments, place the carrier label and FBA Box ID on the same flat face, side by side, with no overlap.

    For floor-loaded shipments, place labels on the side or top of each carton so they stay visible during unloading.

    Palletized freight follows that same visibility rule. But pallet labels do not take the place of carton labels.

    Pallet Labels and Carton Labels Are Not Interchangeable

    A pallet label identifies the pallet itself. It does not replace the carton labels on the boxes under the wrap.

    Apply four pallet labels to the outside of the stretch wrap, one on each side. At the same time, make sure every carton’s Box ID label stays visible.

    Use 4" x 6" matte thermal labels, not inkjet printouts. Matte, smudge-resistant label stock helps cut glare and makes barcodes easier to scan.

    Don’t place clear tape over a barcode. The shine can reflect light and stop the scanner from reading it.

    If you’re using reused cartons, remove or fully cover old labels, barcodes, and markings with opaque tape or a black marker.

    These rules help avoid scan failures that slow down receiving.

    Common Carton Marking Mistakes That Delay Amazon Receiving

    These are the carton-marking errors that most often lead to Amazon receiving delays. Even when the required marks are in place, small labeling slip-ups can still stop cartons from scanning at check-in.

    Wrong, Duplicate, or Missing Box Labels

    One of the most common mistakes is reusing the same FBA Box ID on more than one carton. Each carton needs its own FBA Box ID. If the wrong label ends up on the wrong carton, Amazon can treat it as a shipment mismatch and move it into manual receiving.

    Missing labels cause the same kind of slowdown. So do labels that are faded, torn, or hard to read. In practice, one bad label can hold up the entire shipment.

    Content Mismatches and Wrong Carton Data

    A label can be printed correctly and still cause trouble if the carton contents don’t match it. If the unit count shown on the carton is different from what’s actually inside, Amazon may flag the shipment during check-in.

    Dated products need extra care. Print the date clearly, and make sure the stock falls within Amazon’s shelf-life rules. If the date is hard to read or the product is outside the allowed window, receiving can stall fast.

    Bad Label Placement, Damaged Labels, and Old Barcodes Left on Cartons

    Good data doesn’t help if the scanner can’t read the label. Labels placed on seams, corners, or crushed sides often fail to scan cleanly.

    Reused cartons can create another problem: old barcodes and old markings. If those are still visible, Amazon may scan the wrong code at receiving. Remove them or fully cover them before you add the new label.

    A Carton Marking Workflow to Follow Before Freight Leaves China

    Catch labeling mistakes before pickup in China so you don’t run into receiving delays in the U.S. This is the last carton check to run before freight leaves the factory.

    Pre-Shipment Carton Marking Checklist

    Make sure every unit has an FNSKU label and every carton has its own FBA Box ID from Seller Central. The carton count, weight, and dimensions should match the shipment plan and bill of lading. If the freight is palletized, place four pallet labels on each pallet and use clear stretch wrap. Also, remove or fully cover any old barcodes and labels before pickup.

    If your factory handles prep in China, have one person own this step and sign off before pickup. That simple handoff can help stop last-minute mix-ups.

    How FCLGO Can Help With Carton Compliance for FBA Shipments

    FCLGO

    FCLGO can handle FBA prep, carton labeling, palletizing, inspection, customs clearance, and direct delivery to Amazon. That support helps keep cartons compliant before they reach the carrier.

    Key Carton Marking Points Sellers Should Not Miss

    Before pickup, confirm that each carton has a unique Box ID, correct carton data, a visible origin mark, and no exposed old barcodes. When these details are checked before departure, you’re far less likely to deal with receiving delays.

    FAQs

    Do inner cartons need FBA Box ID labels?

    No. Inner cartons do not need their own FBA Box ID labels.

    If you pack multiple case packs inside one master carton, place the unique FBA Box ID label only on the outside of the master carton.

    That said, any box handled as its own shipment unit still needs its own unique label, even if it’s stacked on a pallet.

    What happens if a carton label is unreadable?

    A hard-to-read carton label can slow down receiving or even get a shipment turned away at an Amazon fulfillment center.

    Amazon needs each carton’s FBA shipment label to be clear and easy to scan so staff can confirm what’s inside and where it needs to go.

    If a label is damaged, covered up, or missing, Amazon may not be able to process the inventory without manual work.

    Can Amazon reject cartons with missing origin marks?

    Yes. Amazon may reject shipments that don’t meet its labeling and documentation rules.

    Amazon mainly checks the FBA Box ID label on each carton. But sellers also need to enter the correct country of origin in Seller Central. If that origin info is missing or wrong, Amazon can reject the shipment, charge storage fees, and delay processing.

  • FCLGO | Air Cargo Volume Weight — FBA Guide 2026

    Air Cargo Volume Weight for FBA: 2026 Guide

    Your air freight bill is based on chargeable weight – not just the rate per kg. If you ship light but bulky FBA cartons, the carrier may bill you by size instead of scale weight. That one rule can shift a shipment from a rough $4.00/kg idea to a much higher total once dimensions are measured.

    Here’s the short version:

    • Actual weight = what your packed cartons weigh on a scale
    • Volumetric weight = space used in the plane
    • Chargeable weight = the higher of the two
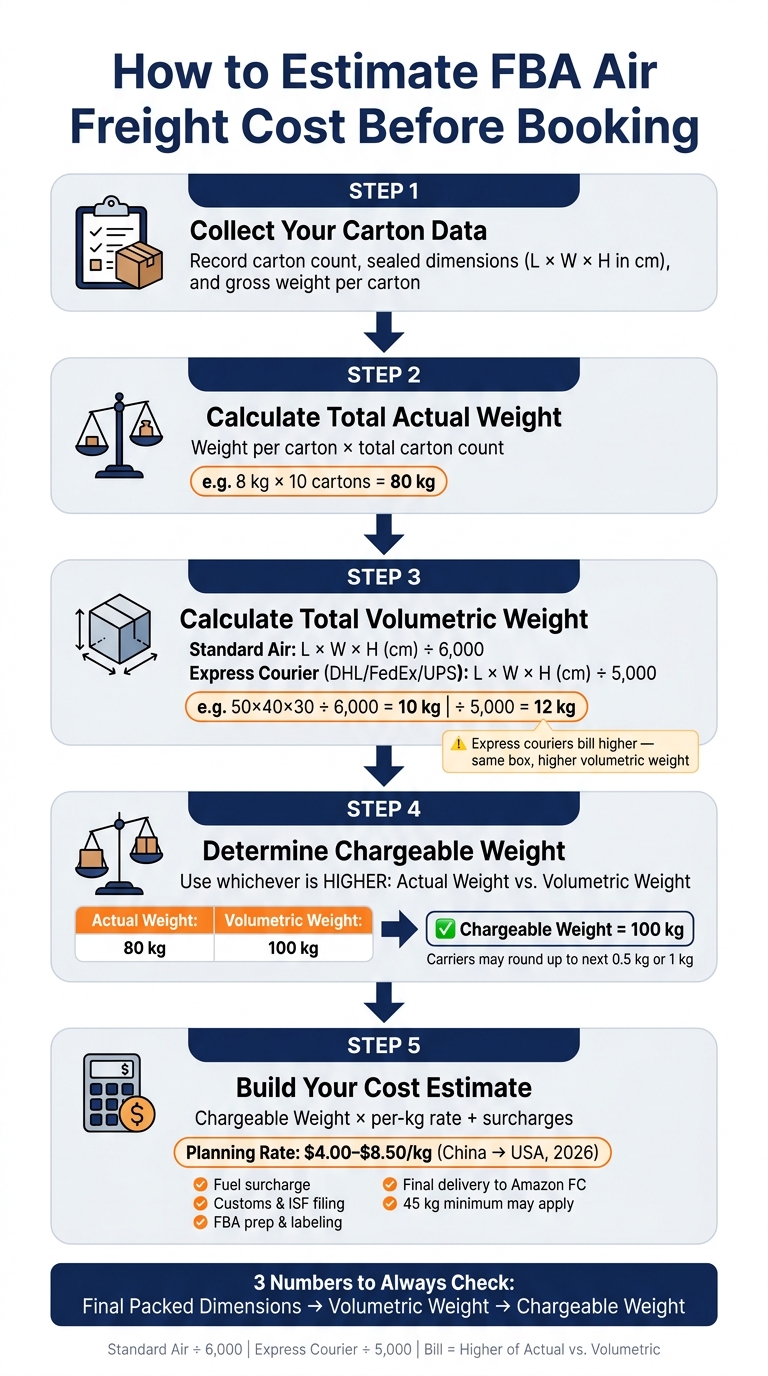
    • Standard air freight usually uses cm ÷ 6,000
    • Express couriers like DHL, FedEx, and UPS often use cm ÷ 5,000
    • Carriers may round up dimensions and billable weight
    • Many quotes also include extra costs like fuel, customs, pickup, and delivery

    A fast example: a 50 × 40 × 30 cm carton has a volume weight of 10 kg under standard air freight, but 12 kg under express rules. If the box only weighs 8 kg, you still pay based on 10 kg or 12 kg.

    If I were checking a quote before booking, I’d focus on just 3 things: <u>final carton size</u>, <u>volume weight</u>, and <u>chargeable weight</u>. That’s where most FBA air cargo cost mistakes start.

    Item What I’d check
    Packed size Measure the sealed carton, not the product
    Formula Use ÷ 6,000 for standard air, ÷ 5,000 for express
    Billing weight Use the higher of actual vs. volume weight
    Extra fees Check fuel, customs, prep, and final delivery
    Planning rate Roughly $4.00–$8.50/kg China to USA

    This guide to shipping to Amazon FBA walks through the math, the measuring rules, the rounding issues, and the main cost points so you can estimate your FBA air shipment before you book.

    Air Cargo Weight Terms Every FBA Seller Should Know

    Actual Weight, Volumetric Weight, and Chargeable Weight Explained

    These are the three billing weights. If you want to price air freight the right way, you need to know what each one means.

    Actual weight is the gross scale weight of your packed cartons or pallets, including packaging. Volumetric weight is a calculated figure based on the space a shipment occupies. Carriers use it for cargo that takes up a lot of room but doesn’t weigh much. Chargeable weight is the invoice weight, which means the higher of actual weight or volumetric weight.

    The standard air cargo density rule is about 167 kg per cubic meter. That matches a divisor of 6,000 cm³ per kg.

    2026 Air Freight Formulas in Metric and Imperial Units

    Use the formula that matches your unit system:

    Unit System Formula Output
    Metric (standard air) L × W × H (cm) ÷ 6,000 Volumetric weight in kg
    Metric via CBM Total CBM × 167 Volumetric weight in kg
    Imperial (to lb) L × W × H (in) ÷ 166 Volumetric weight in lb
    Imperial (to kg) L × W × H (in) ÷ 366 Volumetric weight in kg
    Express courier (DHL/FedEx/UPS) L × W × H (cm) ÷ 5,000 Volumetric weight in kg

    One small detail can make a big difference here: express couriers often use 5,000 instead of 6,000. That means the same box can be billed at a higher volumetric weight when you ship with DHL, FedEx, or UPS.

    Rounding Rules That Change the Final Bill

    Rounding can change the final invoice more than many sellers expect. Carriers often round each dimension up to the next whole centimeter or inch. They also tend to round chargeable weight up to the next 0.5 kg or 1 kg, depending on the tariff.

    So if one side of a carton measures 40.2 cm, it will usually be billed as 41 cm.

    Once you know the billing weight, the next step is measuring the carton correctly.

    Stop Overpaying! How to Calculate Air Freight Volume & Chargeable Weight 🔥

    How To Measure FBA Cartons and Pallets Correctly

    Use the billing rules above to measure the shipment the same way the carrier will.

    Always Measure the Final Sealed Carton, Not the Product

    Measure the final sealed carton after packing and taping.

    A box that measures 40 cm when flat can easily end up at 42 cm once it’s packed and sealed. That extra 2 cm might not sound like much, but it can be enough for automated dimension scanners to log a higher billable size.

    Record the longest side as length, the next longest as width, and the shortest side as height. Include everything that sticks out: tape bulges, poly bag knots, straps, handles, and any overhang. Carriers charge based on the largest point on each side, not the average.

    These dimensions help decide whether actual weight or volumetric weight becomes the billable figure.

    Per-Carton vs. Per-Pallet Calculation

    For SPD (small parcel) shipments, volumetric weight is worked out for each carton on its own and then added across all boxes. Each carton is measured and billed separately, so box sizing matters a lot.

    For pallets, the carrier bills the full footprint plus the total stack height, not each carton by itself. That pallet height should include the pallet base too, which is about 6 in. (15 cm). Empty gaps on the pallet still count as billed space.

    If any carton sticks out past the pallet edge, the carrier uses that outermost point as the pallet dimension.

    Feature Per-Carton (SPD) Per-Pallet
    Measurement basis Individual box dimensions Full pallet footprint + total stack height
    Unused space billed? Only internal box air Includes gaps between boxes and pallet base

    Those measurements feed the chargeable-weight calculation next.

    When Volume Weight Replaces Actual Weight

    Use your carton or pallet measurements to work out the billable weight. Carriers charge whichever is higher: the actual weight or the volumetric weight.

    The Higher-of-Two Rule for Air Freight Billing

    Air freight pricing follows a simple rule: carriers bill the higher of actual weight or volumetric weight. If the volumetric weight comes out higher, that number replaces the actual weight on the invoice.

    This usually affects products that are light but take up a lot of space. Common examples include pillows, bedding, plush toys, apparel, and plastic storage bins. If you are shipping oversized items, professional FBA prep services can help optimize packaging to reduce volume. Heavier, denser goods like ceramic mugs, metal tools, or machine parts usually bill by actual weight because the scale weight is higher than the volumetric weight.

    Density Thresholds for Low-Density Cargo

    Next, compare those dimensions with the shipment’s actual weight. Once volumetric weight is higher than actual weight, volume-based billing takes over.

    Express couriers such as DHL, FedEx, and UPS use a stricter divisor of 5,000 cm³/kg instead of the standard air freight divisor of 6,000 cm³/kg. That means the same box can bill at a higher weight even when the dimensions stay the same. For example, a 50 × 40 × 30 cm carton that weighs 8 kg bills at 10 kg under standard air freight and 12 kg with an express courier.

    Shipping Method Metric Divisor Billed By
    Standard Air Freight 6,000 cm³/kg Higher of actual or volumetric
    Express Courier (DHL/FedEx/UPS) 5,000 cm³/kg Higher of actual or volumetric

    Before booking, compare the volumetric weight with the actual weight. The higher figure becomes the chargeable weight, and that’s the number to use when estimating freight costs ahead of booking.

    How To Estimate FBA Air Freight Cost Before Booking

    Air Cargo Chargeable Weight: How FBA Air Freight Is Billed

    Air Cargo Chargeable Weight: How FBA Air Freight Is Billed

    Once you have the chargeable weight from the last step, you can put together a rough cost estimate before you book. It won’t be your final invoice, but it gives you a solid planning number.

    Step-by-Step Cost Estimate Using Chargeable Weight

    • Collect your carton data. Write down the carton count, sealed-carton dimensions (L × W × H in cm), and gross weight for each carton.
    • Calculate total actual weight. Multiply the weight per carton by the total carton count.
    • Calculate total volumetric weight. Use L × W × H ÷ 6,000 for standard air freight, or ÷ 5,000 for express couriers, then multiply by the carton count.
    • Determine chargeable weight. Use whichever total is higher.
    • Build your cost estimate. Multiply the chargeable weight by the per-kg rate, then add fuel and other surcharges. Many carriers also apply a 45 kg minimum.

    For DDP or door-to-door quotes, make sure pickup, export clearance, customs, ISF filing, duties and taxes, FBA prep, and final delivery are all included.

    If you’re reviewing a door-to-door or DDP quote, check each line item instead of assuming it’s covered:

    Cost Category What to Confirm Is Included
    Origin Factory pickup, export clearance, documentation
    Freight surcharges Fuel, oversized carton fees, minimum weight
    Customs ISF filing, brokerage, import duties, bond
    FBA prep FNSKU labeling, carton labeling, palletizing
    Destination Airport handling, warehousing, trucking to Amazon FC

    2026 China-to-USA Air Freight Rate Ranges for Planning

    For planning, expect $4.00 to $8.50 per kg for standard China-to-USA air freight, based on urgency and volume. Rates often drop once shipments hit 100 kg+, 300 kg+, and 500 kg+. Items like batteries or magnets can push routing costs higher. These numbers are planning figures only. Your actual rate depends on the quote tied to your shipment.

    Using FCLGO To Check Your Pre-Booking Estimate

    FCLGO

    After you build your rough estimate, compare it against an itemized quote. Send your carton count, dimensions, gross weights, and destination fulfillment center details to FCLGO for an itemized quote before booking.

    Conclusion: 3 Numbers To Check Before You Book

    Once you have a rough quote, check these three numbers before you book. Final packed dimensions, volumetric weight, and chargeable weight drive most air freight invoices.

    • Final packed dimensions – Measure the sealed carton, not the product inside. Even a small bump in size can increase chargeable weight across a large shipment.
    • Volumetric weight – Use the correct divisor for your shipping mode. Standard air freight uses L × W × H (cm) ÷ 6,000. Express couriers usually use ÷ 5,000 instead of ÷ 6,000.
    • Chargeable weight – This is the number used for billing. The carrier charges whichever is higher: actual weight or volumetric weight.

    If these three line up with your quote, your freight estimate is probably on the right track. It’s worth checking all three before you ask for a quote, so you can price the shipment more accurately before booking.

    FAQs

    How do I know if my shipment will bill by volume weight?

    Compare your shipment’s actual gross weight with its calculated volumetric weight.

    Volumetric weight = length × width × height in cm ÷ the carrier’s divisor, which is usually 5,000 or 6,000.

    If the volumetric weight is higher than the scale weight, you’ll be billed based on volume weight. Carriers charge whichever number is higher.

    Should I calculate air freight by carton or pallet?

    It depends on how the shipment moves through the carrier’s system.

    For individual cartons, carriers usually work out volumetric weight from each box’s dimensions. For palletized cargo, some carriers look at the pallet’s full footprint and stack height instead.

    Because carriers charge whichever is higher – actual weight or volumetric weight – it’s smart to share both carton and pallet dimensions if you want the most accurate estimate.

    What fees are usually missing from air freight quotes?

    Many air freight quotes leave out costs beyond the base shipping rate. So before you book, check whether export and destination handling, customs clearance, duties, and final delivery to Amazon fulfillment centers are part of the price.

    Some fees slip through the cracks all the time. Common examples include:

    • Airport security and X-ray scanning
    • Air Waybill documentation
    • Terminal handling
    • Destination local charges for cargo release
    • Remote delivery surcharges

    If those items aren’t included upfront, your total landed cost can end up much higher than the original quote.

  • FCLGO | Amazon FBA Freight: DIM & Chargeable Weight

    Amazon FBA Freight Formulas: Dim and Chargeable Weight

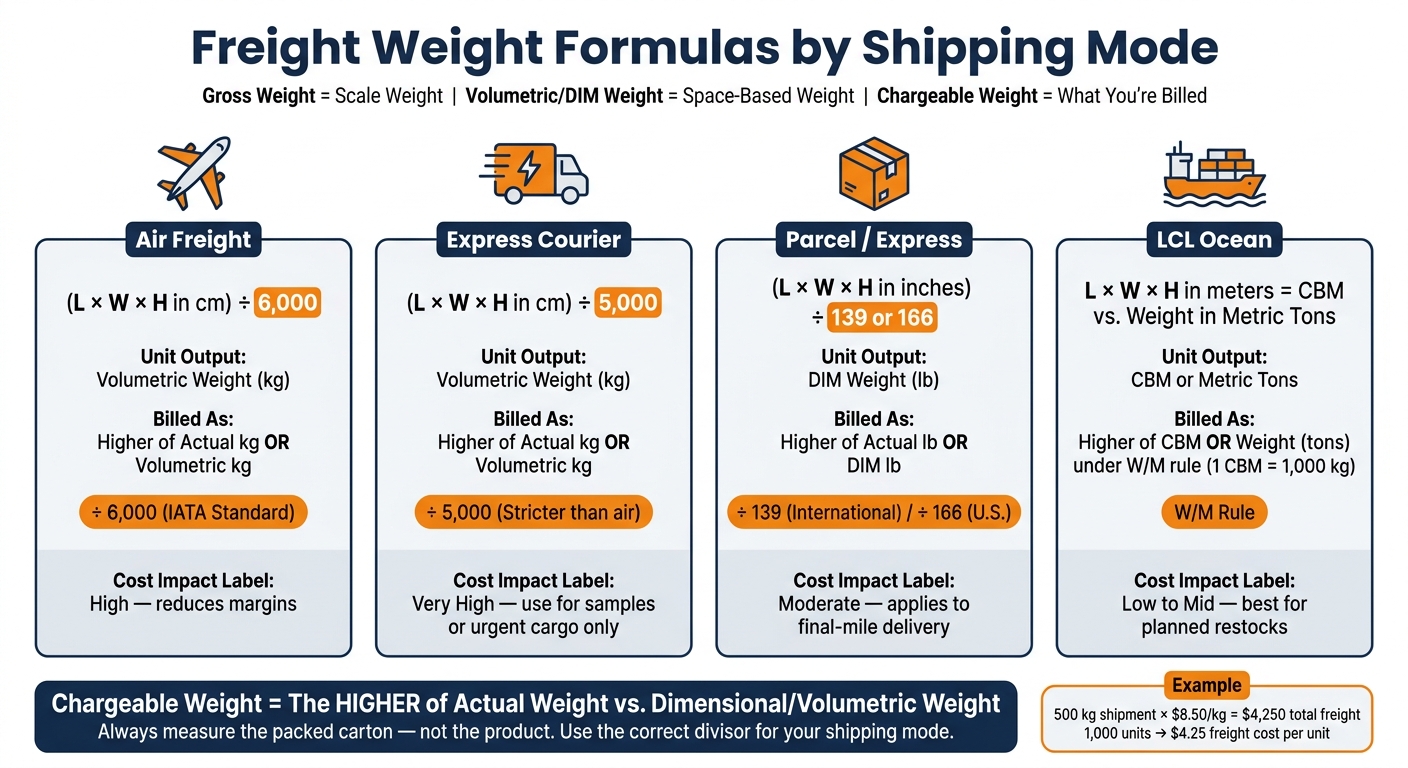
    If you get freight weight wrong, your shipping quote can jump fast. In most cases, the carrier bills your shipment by the higher of its scale weight or its space-based weight.

    Here’s the short version:

    • Gross weight = what the shipment weighs on a scale
    • Volumetric or DIM weight = what the shipment weighs based on size
    • Chargeable weight = the number the carrier uses to bill you
    • Air freight often uses cm ÷ 6,000
    • Express courier often uses cm ÷ 5,000
    • Parcel often uses inches ÷ 139 or 166
    • LCL ocean often uses CBM vs. metric tons under the 1 CBM = 1,000 kg rule

    That means two cartons with the same actual weight can have very different freight costs if one takes up more space. For example, a 500 kg shipment at $8.50/kg costs $4,250. If it holds 1,000 units, freight adds $4.25 per unit.

    What Is Chargeable Weight? | How to Calculate Dimensional Weight in Shipping | SFL Worldwide

    SFL Worldwide

    Quick comparison

    Freight Weight Formulas by Shipping Mode: Air, Ocean & Parcel

    Freight Weight Formulas by Shipping Mode: Air, Ocean & Parcel

    Shipping mode Main formula What gets billed
    Air freight (L × W × H in cm) ÷ 6,000 Higher of actual kg or volumetric kg
    Express courier (L × W × H in cm) ÷ 5,000 Higher of actual kg or volumetric kg
    Parcel (L × W × H in in) ÷ 139 or 166 Higher of actual lb or DIM lb
    LCL ocean CBM vs. weight in metric tons Higher under W/M billing

    I’d keep one rule in mind: measure the packed carton, use the right divisor, and check the billed weight before booking. That one step can help you avoid bad quotes, margin mistakes, and invoice surprises.

    The main freight weight formulas

    Gross weight, volumetric weight, dimensional weight, and chargeable weight defined

    Gross weight is the shipment’s actual scale weight, including packaging.

    Volumetric weight, also called DIM weight, is the billable weight based on how much space the shipment takes up.

    Chargeable weight is the weight used to price the shipment. It’s the number that shapes your freight quote and landed cost.

    Put simply: carriers charge based on whichever is greater – the space your shipment uses or its scale weight.

    Formulas for air, LCL, and parcel shipments

    Different shipping modes use different formulas, which is where things can get a little tricky.

    Air freight uses the IATA standard divisor of 6,000:

    Volumetric weight (kg) = (L × W × H in cm) ÷ 6,000

    Express couriers often use a stricter divisor of 5,000. That leads to a higher chargeable weight:

    Volumetric weight (kg) = (L × W × H in cm) ÷ 5,000

    LCL ocean freight is billed on the greater of actual weight or cubic meters (CBM) × 1,000 kg:

    Volume (CBM) = L × W × H in meters

    Parcel and express shipments billed in pounds use a DIM divisor based on cubic inches. Use the carrier’s DIM divisor. Common values are 139 for international parcels and 166 for U.S. parcels:

    DIM weight (lb) = (L × W × H in inches) ÷ 139 or 166

    One small detail can change the whole quote: the divisor. That’s why it’s smart to confirm the exact one with your carrier before quoting, especially if your account uses custom factors.

    Metric and imperial conversion shortcuts

    If you want to compare quotes cleanly, get everything into the same unit first. Otherwise, you’re comparing apples to oranges.

    To Convert To Multiply By
    Inches (in) Centimeters (cm) 2.54
    Centimeters (cm) Inches (in) 0.3937
    Pounds (lb) Kilograms (kg) 0.4536
    Kilograms (kg) Pounds (lb) 2.2046
    Cubic Meters (CBM) Cubic Feet (ft³) 35.3147

    Carriers also round dimensions and weight up to the next billing increment.

    Once the units match, the next move is to calculate chargeable weight for each shipment.

    How to calculate chargeable weight, step by step

    Now let’s put the formulas to work for each shipment type, one carton at a time.

    Air freight: compare actual kg vs. volumetric kg

    Start with the packed dimensions and the actual scale weight for each carton. Use the finished shipping box, not the product’s own dimensions.

    For each carton, multiply length × width × height in centimeters, then divide by 6,000 to get volumetric weight in kilograms. Work out each carton, add them up for the full shipment, and then compare that number with the total gross weight. The higher total is your chargeable weight.

    Carriers may round dimensions and weight up to billing increments, so even small gaps can change the quote.

    LCL ocean freight: calculate CBM and check shipment volume-to-weight balance

    For ocean LCL, the focus shifts from carton weight to the shipment’s total volume.

    LCL is billed by the billable ton under the W/M rule: either 1 CBM or 1,000 kg, whichever is greater.

    To find total CBM, multiply length × width × height in centimeters, then divide by 1,000,000 to get CBM for each carton. Then multiply that figure by the carton count. After that, convert total gross weight into metric tons by dividing by 1,000. Compare the total CBM with the total weight in metric tons. Whichever number is higher controls billing.

    Parcel and express: use inches, pounds, and the DIM divisor

    For parcel and express shipments, use the sealed carton’s outside dimensions in inches, including any bulges. Multiply length × width × height, then divide by your carrier’s DIM divisor to get dimensional weight in pounds.

    Then compare the dimensional weight with the actual scale weight in pounds. The higher number becomes your chargeable weight.

    Measure the sealed carton, not a loose estimate. Scanners can pick up bulges or uneven sides that manual measuring can miss.

    Applying freight formulas to landed cost planning

    Convert chargeable weight into freight cost per unit

    Once you know the chargeable weight, the math is simple: multiply it by the rate, then divide by the number of sellable units in the shipment to get freight cost per unit.

    Here’s the dollar version. A 500 kg shipment at $8.50/kg costs $4,250. If that shipment contains 1,000 units, freight adds $4.25 per unit. That’s the number that tells you if the shipment still works with your margin.

    Same formula, different shipping mode, very different outcome. That’s where many sellers get tripped up.

    Comparison table: air freight, LCL, and parcel shipments

    Shipping Mode Input Units Chargeable Basis Landed Cost Effect
    Air Freight cm / kg Higher of actual vs. volumetric High; reduces margins
    Express Parcel cm / kg Higher of actual vs. volumetric Very high; use for samples or urgent cargo
    LCL Ocean m / CBM Higher of CBM vs. weight tons Low to mid; best for planned restocks
    Parcel inches / lbs Higher of actual vs. DIM weight Moderate; applies to final-mile delivery

    Common mistakes that lead to billing surprises

    Even the right formula falls apart when the inputs are off.

    A common problem is mixing metric and imperial units. That can turn a normal quote into junk fast. Another big one is using product dimensions instead of packed carton dimensions. Freight carriers bill the shipment you send, not the item sitting by itself. The box, padding, and void fill all add volume. So a carton that looked fine in a spreadsheet can end up billed by DIM weight once the packed dimensions are used.

    Rounding adds another layer. Carriers round up dimensions and weight, which means small changes can bump up billable weight fast. In some cases, a slightly larger master carton is enough to push a shipment from actual-weight pricing into DIM pricing without any obvious warning.

    When to have a freight forwarder check your numbers

    Some shipments are worth a second set of eyes before you book.

    Have a freight forwarder review mixed-carton, palletized, or first-time LCL shipments before booking. FCLGO works with Amazon FBA sellers shipping from China to the USA and can review carton dimensions, actual and volumetric weights, and ocean or air routing options before you commit to a booking.

    Conclusion: Get the weight formula right before you ship

    In practice, freight quotes come down to three numbers: gross weight, dimensional/volumetric weight (the space a shipment uses, turned into billable weight), and chargeable weight. The carrier charges you based on the highest of the three.

    The simplest way to avoid quote mistakes is to measure packed carton dimensions, not product dimensions, use the right divisor for your shipping mode, and keep your unit conversions consistent. If chargeable weight is off, landed cost is off too. And for volume-based cargo, looking at actual weight by itself can make landed cost look lower than it is.

    Small mistakes add up fast. A carrier’s rounding rule, the wrong divisor, or a carton that’s just a bit too large can move a shipment into dimensional-weight pricing with no clear warning. The fix is pretty simple: use the right formula for the right mode, enter packed dimensions, and check chargeable weight before booking.

    FCLGO can review your carton dimensions, gross weight, and shipment details before booking.

    FAQs

    When does DIM weight matter most?

    DIM weight matters most for bulky, low-density cargo that takes up a lot of room compared with what it actually weighs.

    Here’s the part that trips people up: shipping carriers charge based on the higher of the actual weight or the DIM weight. So if the DIM number comes out higher, your shipping cost goes up with it.

    That’s why sellers often get blindsided when they estimate freight costs using only product weight. A shipment can feel light on paper but still cost more because of the space it takes up.

    Do carriers round up dimensions and weight?

    Yes. Carriers often round up measurements when they calculate billable weight.

    In many cases, fractional dimensions get rounded up to the nearest inch before dimensional weight is worked out. Then the final billable weight is often rounded up again to the nearest pound.

    That might sound minor. But across an entire shipment, those small bumps can stack up fast. That’s why accurate carton dimensions and gross weights matter when you request a freight quote.

    How do I estimate freight cost per unit?

    First, figure out your shipment’s chargeable weight or volume.

    That means you need to calculate both:

    • the actual weight
    • the volumetric (dimensional) weight

    Then use whichever number is higher.

    For LCL ocean freight, the rule is a little different. Compare CBM with weight in metric tons under the W/M system.

    Once you have the total shipping quote, divide that amount by the total number of units. That gives you the per-unit freight cost.

  • FCLGO | Amazon FBA Landed Cost Calculator

    Amazon FBA Launch Cost Calculator: China to USA

    If I don’t calculate landed cost before I place a PO, I’m guessing. And that guess can wipe out margin fast.

    Here’s the short version: a China-to-USA Amazon FBA launch cost calculator should include product cost, origin pickup, freight, customs duty, MPF, HMF, ISF, brokerage, FBA prep, palletizing, storage, and final delivery to the Amazon FC. Then I divide the total by my unit count to get landed cost per unit in U.S. dollars.

    What I need to check first:

    • Shipping mode: express, air, ocean LCL, or ocean FCL
    • Supplier terms: FOB or EXW
    • Carton data: count, size, and gross weight
    • Customs data: HTS code, FOB value, EIN/Tax ID, ISF for ocean
    • Prep costs: FNSKU labels, poly bags, bubble wrap, pallet work
    • Final math: total shipment cost, landed cost per unit, break-even price, and margin

    A few numbers shape the decision fast:

    • Ocean LCL: about $80–$150 per CBM
    • Air freight: about $2–$4 per lb
    • Express: about $4–$8 per lb
    • Customs brokerage: about $80–$300 per shipment
    • ISF filing: about $25–$50 per ocean shipment
    • Late ISF penalties can start at $5,000

    If I’m launching a small batch, air may cut transit time but push unit cost up hard. If I’m shipping more volume, ocean often lowers per-unit cost. The whole point of the calculator is simple: find the full cost before booking freight, then test two or three scenarios side by side.

    UPDATED Amazon FBA Calculator – Google Sheets Spreadsheet

    Step 1: Gather the inputs for your cost calculator

    Before you run any numbers, get clean data from your supplier. If key details are missing – or worse, guessed – your freight quote can shift after booking. Carton dimensions and declared value are common trouble spots. And those details flow straight into the cost buckets in Step 2.

    Product, order, and packaging data

    Start with the core details: total unit count, your unit price, and the product category. Use either FOB or EXW pricing, since that changes who covers which costs.

    If your product includes batteries, liquids, or magnets, flag it early. That can change the documents you need and, in some cases, duty rates too.

    Then get the packaging data from your supplier:

    • Total carton count
    • Carton dimensions (L × W × H) in inches or centimeters for each carton type
    • Gross weight per carton in lb/kg

    You’ll use these figures to work out CBM for ocean freight and billable weight for air freight.

    Quote accuracy comes down to the details matching the actual shipment: service scope, delivery point, labeling, and the weight method used by the carrier.

    For air freight, calculate volumetric weight as well. The formula is:

    Volumetric weight = (L × W × H in inches) ÷ 139; carriers charge the higher of actual or volumetric weight.

    Freight and customs inputs

    For the freight quote, collect the origin city or port in China, your destination Amazon FC code, and your shipping method.

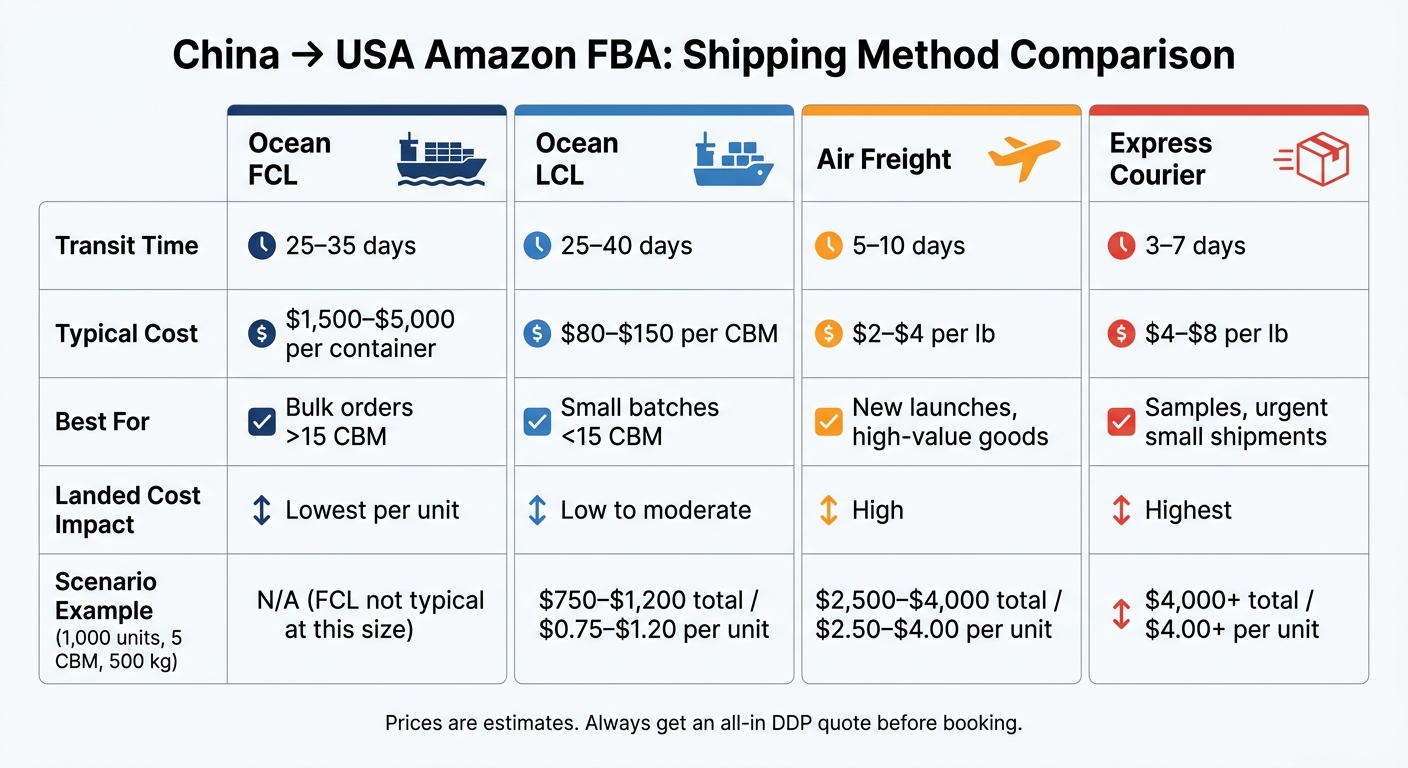
    Shipping Method Transit Time (China to USA) Best For
    Express Courier 3–7 days Samples, urgent lightweight goods
    Air Freight 5–10 days New launches, high-value goods
    Ocean LCL 25–40 days Small batches, cost-sensitive sellers
    Ocean FCL 25–35 days Bulk orders, lowest per-unit cost

    Once you pick the lane, gather the customs details that affect duty and filing. You’ll need the 10-digit HTS code, the declared FOB value for duty calculation, and your Importer of Record details, including your EIN or Tax ID.

    For ocean freight, the ISF must be filed at least 24 hours before vessel departure to avoid penalties. If the quote is DDP, ask for an itemized breakdown that shows ISF, brokerage, and delivery to Amazon.

    Prep, labeling, and pallet inputs

    Now record every prep fee that applies before the shipment reaches Amazon inbound. That includes FNSKU labeling, poly bagging, bubble wrap, FBA Box ID carton labels, and palletizing.

    A couple of common benchmarks:

    • FNSKU labeling starts around $0.10 per unit
    • Palletizing starts at $25 per pallet

    These inputs roll into the cost buckets in the next step.

    Step 2: Calculate each cost bucket from China to Amazon FBA

    Now that you have your inputs, the next move is simple: put a dollar amount on each cost bucket.

    Some charges apply to the whole shipment. Others grow by unit, carton, or pallet. That split matters a lot. If you miss a shipment-level fee on a small test order, your margin can get hit fast.

    Ocean and air shipping costs

    Freight is usually the biggest number in the calculator.

    For ocean LCL, you usually pay by CBM. A common range is $80–$150 per CBM from China to the US West Coast. For ocean FCL, pricing is based on the container itself: about $1,500–$3,500 for a 20-foot container and $2,500–$5,000 for a 40-foot container.

    As a rule of thumb, FCL tends to make more sense once your shipment is above about 15 CBM. Below that point, LCL is often the better option.

    For air freight, standard air is usually around $2–$4 per lb, while express courier is closer to $4–$8 per lb. And here’s the catch: carriers bill based on whichever is higher, actual weight or volumetric weight. So shaving down carton dimensions can lower air cost more than trimming product weight alone.

    It helps to ask for an all-in quote that includes origin charges, freight, customs clearance, duty, and final delivery to the Amazon FC. That way, you see the full picture instead of chasing extra fees later. After freight is priced, move on to duty and import charges.

    Shipping Method Typical Use Case Main Cost Driver Landed Cost Impact
    Ocean FCL Large volume (>15 CBM) Per container rate Lowest per unit
    Ocean LCL Small to mid-size shipments (<15 CBM) Per CBM volume Low to moderate
    Air Freight New launches, urgent restocks Chargeable weight High
    Express Courier Samples, urgent small boxes Chargeable weight Highest

    Customs duty, brokerage, and import charges

    Duty is based on your declared value and the HTS code rate. For US imports, duty applies to the FOB value, not CIF. That detail is easy to miss, but it changes the math.

    It also pays to check the HTS code early. A wrong code can change your duty rate and eat into your margin in a hurry.

    On top of duty, add these import charges:

    Fee Calculation Basis Estimated Cost
    Customs Brokerage Per shipment $80–$300
    ISF Filing Per ocean shipment $25–$50
    MPF 0.3464% of cargo value Min $31.67 / Max $614.35
    HMF (ocean only) 0.125% of cargo value 0.125%
    Port and Terminal Fees Per shipment/container THC / DDC

    A good way to think about this:

    • Brokerage and ISF are shipment-level fees
    • MPF and HMF are based on cargo value

    To find the per-unit effect, divide each shipment-level charge by your total unit count. Then fold those numbers into your launch cost per unit.

    Prep, labeling, pallet, storage, and final inbound delivery

    These costs show up after freight and before Amazon checks in your inventory.

    Services like FNSKU labeling, poly bagging, and bubble wrapping are billed per unit. Carton labeling is billed per carton. Palletization is billed per pallet, and it’s required for LTL inbound shipments. If your goods sit in a US warehouse before the inbound appointment, storage is billed per cubic foot. Then you still have the final leg to Amazon, whether that’s SPD or LTL.

    Fee Type Billing Unit
    FNSKU Labeling Per unit
    Poly Bagging Per unit
    Carton Labeling Per carton
    Palletization Per pallet
    Customs Brokerage Per shipment
    Drayage/Trucking Per shipment
    Storage Per cubic foot

    Step 3: Convert total shipment cost into landed cost per unit and launch margin

    China to USA Amazon FBA Shipping Methods: Cost & Transit Time Comparison

    China to USA Amazon FBA Shipping Methods: Cost & Transit Time Comparison

    The landed cost formula and per-unit calculation

    Once you’ve priced each cost bucket, roll everything into one unit cost and check it against your target selling price.

    Product cost + origin logistics + international freight + customs & duties + destination delivery + prep & labeling + pallet costs + initial storage = Total shipment cost

    Then divide that total by your full unit count to get landed cost per unit.

    Here’s where a lot of sellers get tripped up: some costs are fixed at the shipment level, while others apply to each unit. So you need to spread shipment-level fees across all units, then layer in the per-unit prep costs. That split matters. A shipment can look fine at 2,000 units and look much tighter at 500.

    How to forecast launch margin with Amazon fees

    Landed cost per unit tells you what it takes to get inventory into Amazon’s system. But it doesn’t tell you if the launch makes money.

    To get that number, use this formula:

    Net profit per unit = Selling price − landed cost per unit − Amazon referral fee − FBA fulfillment fee − storage

    Margin % = net profit per unit ÷ selling price × 100

    And if you want the floor price, use this:

    Break-even price = landed cost per unit + Amazon-side fees

    That gives you a quick read on whether your planned price still works after Amazon takes its share.

    Compare launch scenarios before booking

    Before you lock in freight, run two or three scenarios side by side. It’s a simple way to replace guesswork with math. Launch margin shifts fast when freight gets spread across different unit counts and shipping speeds.

    Keep the shipment size and scope the same for each route. That way, you’re comparing apples to apples.

    The table below uses a hypothetical 1,000-unit shipment (5 CBM, 500 kg) and typical China-to-USA freight ranges to show how the same product can look across three common launch routes:

    Scenario Est. Total Shipment Cost Landed Cost Per Unit Transit Time Margin Impact
    Ocean LCL (DDP) $750–$1,200 $0.75–$1.20 30–40 days Highest margin
    Air Freight (DDP) $2,500–$4,000 $2.50–$4.00 7–12 days Lower margin
    Express Courier (DDP) $4,000+ $4.00+ 3–5 days Often uneconomical for launches

    After that, add Amazon referral and fulfillment fees to each scenario and see which route still supports your launch price.

    A common play is to use air for the first batch, then switch to ocean for replenishment when speed matters more than unit cost.

    Conclusion: Use the calculator to reduce cost surprises at launch

    Build the calculator before you book anything. That one step helps you avoid landed-cost shocks at launch. Sellers who skip it often find margin problems after inventory is already inside Amazon’s network, and by then, fixing those problems can get expensive fast. That’s why the calculator isn’t just a spreadsheet. It’s a launch decision tool.

    Use it like a checklist. First, verify your data. Then assign every cost. After that, test a few scenarios before you choose a freight method. In practice, that means four steps:

    • Collect accurate shipment data, including packed carton dimensions, gross weight, and HTS codes
    • Map each cost bucket from factory pickup to Amazon’s dock
    • Divide the total by your unit count to get landed cost per unit
    • Run at least two or three scenarios before you commit to a freight method

    One more thing: always price freight by chargeable weight, not only scale weight.

    For line-by-line quote inputs, FCLGO can supply the freight and fulfillment charges you need. FCLGO handles ocean and air freight, customs clearance, FBA prep, U.S. warehousing, trucking, drayage, and direct Amazon delivery.

    Key takeaways for first-batch and restock planning

    Keep these launch rules in mind:

    • Hidden fees can eat into margins fast: ISF penalties start at $5,000 per late or incomplete filing, and customs bond costs, terminal charges, and Amazon Inbound Placement Service fees should all be part of your forecast.
    • Use air for first-batch speed; switch to ocean for lower-cost replenishment.
    • Check that DDP covers duties, final-mile delivery to the specific FC, and Amazon prep such as FNSKU labeling and palletizing.

    Update the calculator with real quotes before every shipment.

    FAQs

    How do I choose between air and ocean for a launch?

    Choose ocean freight for larger, planned shipments when you have 30 to 45 days of lead time. In most cases, it’s the lowest-cost option.

    Choose air freight or express for launches, urgent restocks, or high-value, lightweight goods when speed matters and you need inventory in 5 to 10 days. With air, pay close attention to chargeable weight. A shipment can look light on paper but still cost more if the boxes are bulky.

    What costs are often missed in landed cost?

    Sellers often focus on the base freight rate and miss the extra charges that show up later.

    That can include U.S. import duties, Section 301 tariffs, MPF, HMF, customs bonds, ISF penalties, and terminal handling charges.

    Amazon adds its own layer of costs too. Common ones include inbound placement fees, storage, palletization, and FNSKU labeling.

    Then there are the domestic shipping costs after the goods arrive, such as inland drayage and last-mile delivery. Packaging or labeling mistakes can also trigger added charges if your shipment doesn’t meet compliance rules.

    How can I lower landed cost per unit before booking?

    Focus on shipping prep and cost control.

    If your cargo goes above 15 CBM, try to move it as FCL instead of LCL. That often cuts your cost. For smaller orders, combine shipments when you can so your LCL cost per unit drops.

    Packaging matters too. Tight, efficient packing can lower dimensional weight and help you avoid paying for wasted space.

    And before you book anything, ask for an all-inclusive, itemized quote. That way, destination charges or handling fees won’t sneak up and push your final cost higher.

  • FCLGO | FCL vs LCL Buffer Time for FBA

    FCL vs LCL Buffer Time for Amazon FBA

    If I need one short answer, it’s this: LCL usually needs more buffer time than FCL for Amazon FBA. I’d plan about 7–14 days of extra time for FCL to the U.S. West Coast, 10–15 days for FCL to the East Coast, 14–21 days for LCL to the West Coast, and 20–30 days for LCL to the East Coast. From August to December, I’d add 10–14 more days.

    Why? Because ocean transit is only part of the trip. Your stock still has to get through origin handling, customs, port pickup, inland delivery, FBA prep, appointment scheduling, and Amazon check-in before it can sell.

    Here’s the short version:

    • FCL has fewer touchpoints, so it often loses less time before and after sailing.
    • LCL often adds 5–10 days vs. FCL because of origin consolidation and destination deconsolidation.
    • If an LCL container gets a customs hold, delay can run 5 days to 3 weeks.
    • FCL can still slip if you miss drayage timing, free time, or an Amazon delivery appointment.
    • Amazon receiving can add its own lag, and FC transfers may take 22–25 days before all units are sellable.
    FCL vs LCL Buffer Time for Amazon FBA: Complete Guide by Lane & Season

    FCL vs LCL Buffer Time for Amazon FBA: Complete Guide by Lane & Season

    FCL vs LCL Shipping Explained | Why LCL Adds Days or Weeks to Your Amazon Inbound | AMZ Prep

    AMZ Prep

    Quick Comparison

    Mode Where time slips first Common extra delay Base buffer I’d use
    FCL After arrival Port pickup, drayage, appointment wait 7–14 days West Coast / 10–15 days East Coast
    LCL Before sailing and after arrival CFS handling, missed cutoff, shared-container hold 14–21 days West Coast / 20–30 days East Coast

    The main point: I wouldn’t plan by sailing time alone. I’d plan by door-to-FBA-ready time, with a bigger cushion for LCL, East Coast lanes, peak season, and any shipment that needs prep or repalletizing.

    2. Where LCL needs more buffer days

    LCL usually needs extra time on both ends of the trip. At origin, cargo has to be grouped with other shipments. At destination, that same shared container has to be broken apart before your freight can move. And because release depends on a shared box, delays can stack up fast after the vessel lands in the U.S.

    Origin consolidation and missed cutoff risk

    Before LCL cargo even gets near the vessel, it has to go to an origin Container Freight Station (CFS). That’s where it gets sorted and packed together with other shipments. This step adds 2 to 4 days to the timeline.

    But the bigger issue is the cutoff.

    Most LCL consolidators work on a weekly sailing cycle. So if your factory delivers cargo just one day late, the shipment can miss that week’s consolidation and roll to the next sailing. That means 7 more days before the container even leaves port.

    Miss the cutoff, and your ETD moves with it. Over 40% of sailings on major Asia–U.S. lanes see ETD shifts of 24 hours or more between booking and actual departure. If your ETD moves by more than 48 hours, recalculate your inbound coverage right away. For LCL sellers, ETD drift is often the first sign that more delay is coming.

    Destination deconsolidation, CFS release, and port handling

    Once the vessel arrives, LCL cargo still isn’t ready for pickup. The container first has to be trucked from the pier to a bonded destination CFS. There, it’s devanned, sorted, and split by shipper. That adds another 2 to 4 days.

    Then comes one of the biggest LCL headaches: shared-container customs risk.

    If Customs places a hold on another shipper’s cargo in the same container, everyone can get stuck waiting. That can delay release by 5 days to 3 weeks. FCL doesn’t carry that same shared-box risk.

    LCL buffer drivers and lead time impact: comparison table

    These are the main points where LCL tends to lose time.

    Delay Point Buffer Impact What’s Actually Happening
    Origin CFS sort and build-out +2–4 days Cargo is sorted and grouped with other shipments before loading
    Missed weekly cutoff +7 days Missing the vessel cycle rolls the booking to the next sailing
    Destination CFS devanning +2–4 days Container is hauled to a bonded CFS, unloaded, and sorted before release
    Customs exam (shared container) +5–21 days A hold on any co-loader’s freight can delay the entire container
    Port congestion +3–10 days LCL cargo may wait for drayage to the CFS before your cargo can be released

    FCL shifts the timing problem away from consolidation and more toward what happens after arrival.

    3. Where FCL needs tighter post-arrival control

    LCL usually burns time before sailing and after landing. With FCL, the pressure moves somewhere else: pickup, drayage, and the final Amazon handoff.

    Because FCL skips CFS handling, it can move faster after arrival. But that speed only matters if pickup and delivery stay on track once the container is discharged.

    Container pickup, free time, and drayage timing

    Every FCL container comes with a limited free-time window at the terminal. Miss that window, and demurrage starts. Once the container leaves the port, per diem starts running too, usually at about $200–$300 per day per container until the empty is returned.

    That’s why drayage needs to be arranged before the vessel arrives, not after. Waiting until the container is already sitting at the port is asking for trouble. Port congestion and pickup delays can add 2 to 5 days on their own, so that extra time needs to be built into the plan.

    At that point, the next big timing factor is simple: how the container is loaded.

    Floor-loaded containers, palletizing, and Amazon appointment timing

    The way a container is packed has a direct effect on how fast inventory gets checked in at Amazon. It changes unload time, detention risk, and how easy it is to lock in an appointment.

    A palletized FCL container usually unloads in about 1 to 2 hours. Floor-loaded freight is much slower.

    Floor-loaded containers can take 4 to 6 hours to unload, and sometimes more than 12 hours. Most trucking companies give only a short free waiting window before detention begins, often at about $75 per hour. That cost adds up fast.

    There’s another problem. Floor-loaded containers are harder to book at Amazon fulfillment centers. During Q4, Amazon may reject them because manual unloading takes more labor. If that happens and the cargo has to be transloaded and palletized at a 3PL, rework costs can top $10,000, including storage and redelivery.

    Book the Amazon appointment early. If the driver arrives late, the slot can be canceled, and getting a new one may take several days. If the appointment is pushed too far out, a common fix is to unload at a nearby 3PL first, then deliver later under a new appointment.

    The table below shows where FCL buffer time usually slips.

    FCL buffer drivers and lead time impact: comparison table

    Delay Point Buffer Impact What’s Actually Happening
    Port dwell +2–5 days Time to secure drayage and clear terminal congestion after discharge.
    Truck scheduling +1–2 days Coordinating pickup timing with Amazon appointment availability.
    Transload/pallet prep +1–3 days Needed if the container must be unloaded at a 3PL before final delivery.
    Amazon appointment wait Several days Time to secure an appointment slot in Carrier Central.
    Amazon check-in lag Time from delivery to check-in Time from dock arrival to checked-in status.

    4. How to plan buffer time by shipment type, route, and season

    Suggested buffer ranges for FCL and LCL replenishment

    Use the delay points above to set a lane-specific buffer, not one global number for every shipment. And keep that buffer separate from ocean transit. The buffer is there to cover drayage, delivery appointments, and receiving lag.

    For FCL, a solid planning range on the West Coast is 7 to 14 days on top of port-to-port transit time. East Coast lanes usually need 10 to 15 days. That gap matters. If you use the same buffer for both lanes, your reorder plan can get out of sync fast.

    LCL should sit at the higher end because CFS handling and deconsolidation add extra time. On the West Coast, that usually means 14 to 21 days of buffer. On East Coast lanes, plan for 20 to 30 days.

    From August through December, add 10 to 14 days to your base range. Port labor slowdowns, warehouse backlogs, and holiday closures can stretch both lanes. If you’re planning for a new launch, use the high end of the range.

    West Coast vs East Coast timing and Amazon check-in lag

    A shipment moving from Shenzhen to Los Angeles takes about 14 to 18 days port-to-port. The same cargo going to New York or Savannah takes about 25 to 35 days.

    That’s a 7-to-21-day gap in base transit before you add any buffer at all. Put simply: West Coast routes give you a shorter sailing window and a bit more control after arrival. East Coast routes come with a longer sailing timeline, so they need more padding.

    One more thing trips people up all the time: the 24- to 48-hour tracking gap that can happen during carrier handoffs or Amazon check-in. If you don’t account for that in your reorder math, a late scan can look like a stockout when the inventory is still moving through the system.

    FCL vs LCL buffer recommendations by lane and risk level: comparison table

    Shipment Mode Typical Route Main Delay Drivers Suggested Planning Buffer
    FCL China → U.S. West Coast Port congestion, drayage, Amazon appointment lag 7–14 days
    LCL China → U.S. West Coast CFS deconsolidation, shared-container customs hold 14–21 days
    FCL China → U.S. East Coast Longer ocean transit, canal transit delays, port labor 10–15 days
    LCL China → U.S. East Coast CFS handling, extended transit, multi-port stops 20–30 days
    All lanes (peak season) All routes Port backlog, warehouse congestion, holiday closures Add 10–14 days.

    5. Conclusion: picking the right buffer strategy for Amazon FBA

    LCL usually needs a bigger buffer. FCL, on the other hand, needs tighter control after the shipment arrives.

    Neither shipping mode is safer by default for your Amazon replenishment plan. The right move is to set your buffer based on the lane, the season, and the fulfillment path. For example, a floor-loaded FCL shipment going to a prep warehouse will need extra time for repalletizing before it can be delivered to Amazon.

    If your cargo moves through a U.S. buffer warehouse, build in both storage time and transfer time. The best buffer isn’t the biggest one. It’s the one that fits your lane, your handling steps, and Amazon’s receiving pace.

    FCLGO helps sellers move FCL and LCL shipments from China to the U.S. with customs, drayage, prep, warehousing, and Amazon delivery support.

    FAQs

    How do I choose FCL or LCL for Amazon FBA?

    Choose based on shipment volume, inventory, and budget.

    FCL is often the better pick for larger shipments – usually around 15 to 25 CBM or more. It tends to give you a lower cost per cubic meter, faster transit, and less handling along the way.

    LCL is often the more cost-effective option for smaller shipments, especially those under 15 CBM.

    Timing matters too. LCL shipments need consolidation and deconsolidation, which can add extra days compared with FCL. So if your stock is running low or you’re working against a tight deadline, that delay can make a big difference.

    Your shipping plan also needs to match Amazon FBA rules, including:

    • Palletizing
    • FNSKU labeling
    • Delivery appointments

    When should I add more buffer than the standard range?

    Add more buffer during peak seasons or holidays. During those periods, Amazon fulfillment center receiving often takes longer than the usual 24–48 hours.

    You’ll also want extra time for high-risk routes, especially East Coast shipments, plus LCL or consolidated freight. Those shipments come with extra port handling and deconsolidation, which can slow things down.

    If your inventory is under 10 days, switch to a faster shipping method instead of depending on standard ocean freight.

    How does palletizing affect FBA delivery timing?

    Palletizing can speed up FBA delivery because it makes unloading at Amazon fulfillment centers faster and easier to plan.

    When a container is floor-loaded, workers have to unload it by hand. That process can take 4 to 12 hours and may lead to detention fees.

    With palletized shipments, teams can use equipment to unload freight instead of doing the whole job manually. That can also help you avoid delivery rejections.

    Using 40-inch by 48-inch pallets and wrapping them the right way with stretch wrap can cut delays tied to manual off-loading, rework, or warehouse capacity issues.

  • FCLGO | Air Freight Timeline: China to USA FBA

    China to USA Air Booking Timelines for FBA

    If I need Amazon FBA stock live on time, I don’t plan around the flight. I plan around the full chain. A China-to-U.S. air shipment may fly in about 12–14 hours, but the full path usually runs 5–10 days door to door, plus 3–7 business days for Amazon to check it in.

    Here’s the short version:

    • Book air freight early: usually 2–5 days before cargo is ready
    • Book earlier in Q4 or for battery goods: about 7 days ahead
    • Factory pickup + China export: about 1.5–4 days
    • Airport-to-airport transit: often 3–7 days
    • U.S. customs + warehouse prep + FC delivery: about 2–7 days
    • Amazon receiving after delivery: 3–7 business days

    That means a “fast” air shipment can still take 10–17+ days before inventory is sellable.

    A few things decide whether the shipment stays on schedule:

    • Route: West Coast lanes are often faster than East Coast lanes
    • Cargo type: batteries and magnets need extra screening and routing
    • Documents: invoice, packing list, HTS/HS data, Tax ID, and bond must match
    • Carton specs: air charges can change if carton size changes late
    • Amazon prep: labeling or carton mistakes can delay receiving or trigger fees

    If I had to boil it down to one rule, it’s this: count backward from the date inventory must be available in Amazon, not the date the plane lands.

    Stage Usual Time
    Booking lead time 2–5 days before cargo ready
    Origin handling in China 1.5–4 days
    Air transit 3–7 days
    U.S. side processing 2–7 days
    Amazon check-in 3–7 business days

    So if I’m planning a restock, I treat air freight as a full-process timing job, not just a flight booking.

    China to USA Air Freight Timeline for Amazon FBA: Full Door-to-Door Breakdown

    China to USA Air Freight Timeline for Amazon FBA: Full Door-to-Door Breakdown

    China to Amazon FBA Shipping Explained | Air Freight vs Sea Freight Strategy for Beginners

    Step 1: Book Air Freight Before Cargo Is Ready

    Book air freight 2–5 days before the cargo-ready date. If you’re shipping in Q4 or sending battery cargo, book about 7 days ahead. Space gets tighter in Q4, so if you wait too long, your shipment is more likely to roll to the next flight.

    Once space is booked, the next steps are pretty straightforward: pickup, export clearance, and flight departure.

    Documents and shipment details needed to book

    Send these details as early as you can so the forwarder can secure space and help you avoid a rebooking headache.

    Document / Detail What to Include
    Commercial Invoice Unit price, total shipment value, currency, buyer/seller info, HS codes
    Packing List Carton count, units per carton, net/gross weight, dimensions
    Booking Form Supplier pickup address, cargo ready date, preferred departure airport, battery status
    Amazon FBA Shipment Plan Destination Amazon FC code and shipment details

    One issue trips people up all the time: chargeable weight. Air freight charges based on whichever is higher: actual weight or volumetric weight. Volumetric weight is calculated as Length × Width × Height (in cm) ÷ 6,000.

    That means final packed carton dimensions matter a lot. If those numbers change late, the final invoice can jump.

    Also, each carton should stay under 50 lbs (22.6 kg) to meet Amazon’s receiving rules. Go over that limit, and you could end up dealing with repacking fees or a rejected shipment at the fulfillment center.

    Once the booking is confirmed, the factory can release the cargo for pickup.

    Airline cutoffs, document deadlines, and booking risks

    Make sure all booking data matches the commercial invoice and packing list. Even small mismatches can cause airline or customs holds. Batteries and magnets need to be declared up front. They also require MSDS and UN38.3 documents.

    Using FCLGO to manage booking and FBA coordination

    FCLGO

    FCLGO can handle booking, factory pickup, export paperwork, and Amazon FBA delivery in one workflow. After that, the shipment moves into origin handling and export clearance.

    Step 2: Factory Pickup, Origin Handling, and China Export Clearance

    Once the booking is confirmed, the China origin stage starts. This part covers everything from the truck pulling out of the factory gate to the cargo being handed over to the airline. In a smooth shipment, this takes about 1.5 days. If things slip, it can stretch to 4 days before the flight leaves.

    Factory pickup and transfer to the origin airport

    Factory pickup and export handling usually take 1.5–4 days before flight handoff. The pickup itself often takes 0.5–2 days, mostly based on how far the factory is from the origin airport.

    Small prep mistakes can throw off the whole schedule. If packing runs late or labels are missing, pickup gets delayed. The safest move is simple: make sure cartons are packed, weighed, and labeled with the correct FBA Box ID and FNSKU labels before the driver shows up.

    Origin warehouse processing and export customs timing

    After the cargo reaches the forwarder’s warehouse, it goes through check-in, security screening, weighing, and palletization. That step usually takes 4 to 24 hours. At the same time, the forwarder submits the export declaration to Chinese customs.

    Export clearance usually goes through in about 1 day when the declared value, HS code, and exporter details all match. But customs can put the shipment on hold if the commercial invoice and packing list don’t line up, the HS code is wrong, or exporter details are missing. When that happens, the timeline gets pushed back. Goods with batteries or magnets need extra attention and must go through specific security screening.

    Origin Activity Estimated Time Common Delay Points
    Factory Pickup 0.5–2 days Distance from hub, cargo not ready, labeling issues
    Warehouse Processing 4–24 hours Oversized or overweight cartons, incorrect labels, consolidation needs
    Export Customs ~1 day HS code errors, valuation mismatches, missing exporter details
    Total Pre-Flight 1.5–4 days Combination of the above

    After export release, the shipment moves to flight departure and U.S. import processing.

    Step 3: Flight Departure, U.S. Customs, Warehouse Prep, and Amazon Delivery

    Flight departure and U.S. customs release timing

    Once the shipment clears export in China, the next stretch is the U.S. side.

    Direct air routes to West Coast gateways like LAX or SFO usually take 3–5 days, while East Coast airports like JFK or EWR often take 4–7 days. After the plane lands, the U.S. processing timeline begins.

    For clean entries, CBP often releases cargo within 24 hours. But if the filing has mistakes, or if the shipment gets pulled for an exam, that can add 1–5 business days. To keep things moving, the filing needs a correct HTS code, a valid importer Tax ID (IRS No.), and an active customs bond.

    Once CBP releases the shipment, it heads to warehouse prep.

    U.S. warehouse prep and Amazon delivery appointment timing

    After customs release, the cargo goes to a U.S. warehouse for unloading and FBA prep. At this stage, the goods are checked and made ready for Amazon. That can include FNSKU labeling, poly bagging, bubble wrapping, carton labeling, and palletizing.

    This part usually takes 1–3 days, depending on how many units are involved and how much prep the shipment needs.

    Small mistakes here can turn into a headache. Amazon prep errors may lead to refusal, return, disposal, or added fees. After prep is finished, the carrier books the Amazon delivery appointment. If you’re using FCLGO, that process can be handled end to end, from U.S. warehouse prep through direct delivery to Amazon fulfillment centers.

    Amazon receiving after proof of delivery

    Proof of delivery doesn’t mean the inventory is ready to sell.

    After the carrier drops off the shipment, Amazon still has to receive the cartons and scan them into the system. In most cases, inventory becomes available for sale within 3–7 business days after receiving.

    That gap matters more than many sellers expect. If you’re planning replenishment, build this extra time into your schedule, especially from August through November, when delays tend to show up more often.

    Stage Estimated Duration Key Delay Risks
    Flight Transit (China to U.S. Gateway) 3–7 days Routing, connections, service level
    U.S. Customs Release + Trucking 2–5 business days Missing Tax ID, HTS errors, no customs bond
    Warehouse Prep (Labeling/Palletizing) 1–3 days Labeling errors, repackaging needs, unit volume
    Amazon Receiving (Check-in to Available) 3–7 business days FC workload, inbound processing volume

    Full Timeline Summary and Buffer Planning for FBA Replenishment

    Timeline breakdown table by shipment stage

    Use the timeline below to count backward from the date inventory needs to be live in Amazon.

    Phase Stages Covered Typical Duration
    Booking & Document Prep Booking lead time, document submission 1–2 days
    China Origin Handling Factory pickup, warehouse processing, export clearance 2–4 days
    Flight Transit Departure to U.S. gateway airport 1–3 days
    U.S. Side Customs clearance, warehouse prep, final delivery to Amazon FC 2–7 days
    Amazon Receiving Check-in to inventory live in Seller Central 3–7 business days

    Tight vs. safe planning windows for urgent and normal restocks

    The main planning issue is simple: how much buffer should you build into each restock window?

    Quoted transit time often covers the flight only. It usually does not cover the full door-to-door timeline.

    Scenario Tight Window Safe Window
    Normal Restock 10–14 days 20–25 days
    Product Launch 15–18 days 30 days
    Prime Day / Q4 Peak 20–25 days 35–45 days

    Q4 bottlenecks can add 1–3 days, and air freight rates climb 15%–30% from August through December. That’s why you should plan to the available date, not the delivery date.

    Key takeaways for scheduling China-to-USA air freight to FBA

    A few things matter most here:

    • Book early. Secure space 24–72 hours before cargo is ready, especially during peak periods.
    • Verify documents first. An incorrect HTS code, missing customs bond, or incomplete invoice can hold up a shipment for days.
    • Count backward from the available date. Amazon receiving adds 3–7 business days after delivery, so that time needs to be part of every replenishment window.

    If you’re managing multiple SKUs or you’re cutting it close on restock timing, FCLGO can handle booking, FBA prep, customs clearance, and direct FC delivery in one workflow, which helps cut coordination delays.

    FAQs

    How far in advance should I book air freight for FBA?

    Book your air freight as early as you can. That gives you enough time for cargo pickup, customs clearance, and any last-minute issues like flight overbooking.

    In most cases, air freight takes 5 to 12 days. But booking early lowers the chance that your shipment gets rolled to a later ETD.

    It also helps to lock in space well before your required in-stock date. Security checks, paperwork mistakes, and peak-season demand can all push departure timing back.

    Why does air freight take longer than flight time?

    Air freight takes longer than the flight itself because the plane ride is only one part of the job.

    Before cargo even leaves the ground, it usually has to move through several required steps: factory pickup, cargo consolidation, export customs clearance, and terminal handling. After landing in the U.S., the shipment still needs to go through U.S. customs processing and final delivery to the Amazon fulfillment center.

    That’s why a shipment can spend far more time on the ground than in the air. Paperwork, inspections, and carrier schedules can slow things down, and each stage can add a day or two.

    What issues most often delay FBA air shipments?

    The most common delays come from customs compliance, documentation, and Amazon receiving requirements.

    Typical causes include mismatched shipping documents, missing tax, bond, or product certification details, undervalued or undeclared restricted goods, incorrect or outdated FNSKU labels, cartons over 50 pounds, poor packing, shipping before inventory is ready, and missed final-mile delivery appointments.

  • FCLGO | Air vs Ocean Freight: Cost & Transit Guide

    Ocean Freight vs Air Freight: Cost and Speed Compared

    If you need the lowest shipping cost, use ocean freight. If you need inventory in Amazon FBA fast, use air freight.

    When I compare the two for China-to-USA FBA shipments, the tradeoff is clear:

    • Ocean freight: about 25–52 days door-to-door, with lower cost
    • Air freight: about 3–10 days door-to-door, with much higher cost
    • FCL ocean: often makes more sense once a shipment gets above 15 CBM (use a CBM calculator to check your volume)
    • Air freight: often runs about $4–$8.50 per kg
    • LCL ocean: often runs about $80–$180 per CBM
    • Air can cost 12x to 16x more than sea on similar cargo

    That means your choice usually comes down to three things:

    • How soon you may run out of stock
    • How big and heavy the shipment is
    • How much shipping cost your margin can absorb

    If I had to boil the whole article down to one line, it would be this: use ocean for planned restocks and air for urgent restocks.

    Ocean Freight vs Air Freight: Cost & Speed Comparison for Amazon FBA

    Ocean Freight vs Air Freight: Cost & Speed Comparison for Amazon FBA

    China to Amazon FBA Shipping Explained | Air Freight vs Sea Freight Strategy for Beginners

    Quick Comparison

    Factor Ocean Freight Air Freight
    Door-to-door transit 25–52 days 3–10 days
    Main pricing method Per container or CBM Per kg
    Cost level Lower Higher
    Best for Bulk restocks, heavy cargo, lower-margin goods Urgent restocks, launches, lighter goods
    Common shipment types FCL and LCL Standard air and express air
    Key watchout More delays from port handling and Amazon check-in Volumetric weight can push cost up

    A few points matter right away.

    With ocean freight, the low base rate is only part of the bill. You still need to account for origin charges, customs, destination fees, trucking, and Amazon receiving time. With air freight, the main trap is chargeable weight, because carriers may bill on box size instead of actual scale weight.

    I’d also keep one deadline in mind: the Importer Security Filing (ISF) for ocean shipments must be filed 24 hours before the vessel leaves China, or the fine can be $5,000 per shipment.

    So before I book anything, I’d ask one simple question: am I trying to cut freight cost, or am I trying to prevent a stockout? That answer usually points to the right shipping mode fast.

    Ocean Freight: Lower Cost, Longer Transit Time

    Ocean freight works best when you can plan your inventory in advance.

    How Ocean Freight Costs Are Calculated

    Ocean pricing changes based on one simple thing: are you booking a whole container, or just part of one?

    With FCL (Full Container Load), you pay one flat rate for the entire container, no matter how packed it is. A 20-foot container holds about 33 CBM and usually costs $1,500–$3,500 to the U.S. West Coast. A 40-foot container holds about 67 CBM and usually runs $2,500–$5,000 to the same ports. If you’re shipping to East Coast ports like New York or Savannah, expect to add about $500–$1,000.

    With LCL (Less than Container Load), you share container space with other shippers, so pricing is based on volume. All-in rates to the U.S. West Coast are usually $80–$150 per CBM. This can work well for smaller shipments. But once you get past about 15 CBM, FCL often gives you better value.

    The base ocean rate is only part of the bill. Your total landed cost also includes origin charges, U.S. customs fees, destination charges, and final-mile trucking to the Amazon fulfillment center. That’s why it’s smart to ask for an all-in quote that covers delivery all the way to the FBA warehouse. A quote to a U.S. port is not the same as a quote to your Amazon FC.

    There’s also one deadline you don’t want to miss: the Importer Security Filing (ISF). It has to be filed at least 24 hours before the vessel leaves China. Miss it, and you can face a mandatory $5,000 fine per shipment.

    Lower shipping cost sounds great on paper. But it only works if the goods show up before your stock gets tight.

    Typical Ocean Freight Transit Time from China to the USA for FBA Shipments

    For door-to-door delivery, standard ocean freight from China to the USA usually takes 25–35 days to the West Coast and 38–52 days to the East Coast.

    Origin Port Destination Port Port-to-Port Transit
    Shenzhen / Yantian Los Angeles / Long Beach 14–18 days
    Shanghai Los Angeles / Long Beach 16–22 days
    Ningbo Los Angeles / Seattle 15–20 days
    Any China Port New York / Savannah / Houston 25–35 days

    The sailing time is only one piece of the timeline. You also need to factor in origin handling, export customs, U.S. customs clearance, port congestion, drayage from the port to the warehouse, and Amazon’s own receiving process. After the carrier delivers to the fulfillment center, Amazon can take 3–7 business days to receive the inventory internally. A lot of sellers get tripped up here. Your units are not sellable the minute they reach the dock.

    FCL is usually faster than LCL because it skips the extra consolidation and deconsolidation steps at the port. LCL can add several days to the full timeline because of that added handling.

    If that transit window doesn’t fit your inventory cycle, air freight is the faster fallback.

    Air Freight: Higher Cost, Much Faster Delivery

    If ocean freight works for planned replenishment, air freight is what you use when stock can’t sit around and wait. When inventory is getting thin, air is often the go-to move for urgent restocks.

    How Air Freight Pricing Works

    Air freight pricing isn’t based only on what your shipment actually weighs. Carriers bill based on chargeable weight, which means they use whichever is higher: the actual weight or the volumetric (dimensional) weight.

    Here’s the catch: volumetric weight can change the math fast. It’s worked out by multiplying a carton’s length × width × height (in cm) and dividing by a carrier-set divisor, usually 5,000 or 6,000 depending on the airline. So if you’re shipping something light in a big box, the box size can push the price up a lot.

    Standard air freight from China to the USA usually costs $4–$8 per kg.

    If you use DDP air service, the rate often rolls several costs into one per-kg price, including freight, customs brokerage, duties, and final delivery.

    Typical Air Freight Transit Time from China to the USA for FBA Shipments

    For door-to-door delivery, air freight from China to a U.S. Amazon fulfillment center usually takes 5–10 days. If the shipment is smaller and time-sensitive, express service can trim that down to 3–7 days.

    Phase Estimated Duration
    Pickup & Export Handling 1–2 days
    Flight Time & Airport Handling 2–5 days
    US Customs & Last-Mile Delivery 1–2 days
    Total Door-to-Door 5–10 days

    This is where air freight stands apart. You pay more, but you get speed. And when you’re lining up shipment size, urgency, and profit margin side by side, that tradeoff matters a lot.

    Ocean Freight vs Air Freight: Cost and Speed Compared Side by Side

    Once you know how to ship to Amazon FBA and understand the basic cost and transit ranges, the next step is simple: line them up against your restock deadline or replenishment window.

    Factor Ocean Freight Air Freight
    Typical Transit Time 25–45 days door-to-door 5–10 days door-to-door
    Typical Cost Low – priced per CBM or container High – priced per kg
    Best Use Case Planned replenishment, bulk inventory Urgent restocks, new product launches
    Best Fit Large volumes (>15 CBM), heavy or bulky goods Small, lightweight shipments; light, high-value items

    Cost Difference by Shipment Size and Product Margin

    This is where the gap hits hardest, especially if your margins are tight.

    Air freight runs $4–$8.50 per kg. By contrast, LCL ocean freight costs about $80–$180 per CBM. On the same cargo, air freight can cost 12 to 16 times more than sea freight.

    That kind of spread changes the math fast. If you’re shipping high-margin SKUs or trying to cover an emergency restock, paying more for air can make sense. It can help you avoid stockouts and protect Amazon sales rank. But if the product is heavy or your margin is slim, ocean freight is usually the safer play on cost.

    Speed Difference: Planned Replenishment vs Urgent Restocks

    Price is only half the story. Timing can make the call for you.

    Air freight works when your lead-time buffer is gone. It cuts door-to-door delivery to 5–10 days, compared with 25–45 days for ocean freight. If you planned ahead, ocean is often fine. If inventory is getting low and the clock is ticking, air gives you a much shorter path.

    When to Choose Ocean Freight and When to Choose Air Freight

    For most sellers, the choice comes down to three things: time, shipment weight, and margin.

    Scenario Recommended Mode
    Predictable demand, at least 4–6 weeks of lead time Ocean Freight
    Stockout risk soon Air Freight
    Heavy, bulky, or low-margin products Ocean Freight
    Lightweight, high-value SKU Air Freight
    New product launch needing fast market entry Air Freight
    Large bulk restock (>15 CBM) Ocean Freight

    "Choosing the wrong freight method can destroy your margins and leave your customers waiting for weeks." – Bruce, CEO & Founder, MBMLog

    Use ocean for planned replenishment. Use air for urgent restocks.

    How to Choose Between Ocean and Air Freight With FCLGO

    FCLGO

    Now that the cost and speed tradeoff is clear, the next move is simple: pick the shipping mode that fits your inventory risk.

    Look at three things: lead time, shipment size, and margin. Ocean freight makes sense when you have 40+ days of lead time and you’re moving larger, heavier shipments. Air freight is a better fit when you’re facing sub-10-day stock risk, planning a launch, or sending small, high-value batches where faster restocking makes financial sense.

    Sometimes the best answer isn’t one or the other. Split shipping can help you cover urgent demand: send part of the inventory by air to get stock in fast, then move the rest by sea.

    After you pick the mode, execution matters just as much. A delay in pickup, customs, or FBA check-in can throw off the whole plan. FCLGO handles pickup, export documents, customs clearance, FBA prep, warehousing, and delivery to Amazon fulfillment centers.

    Ocean freight cuts cost. Air freight cuts lead time. The right choice comes down to your margin and how much stock risk you can afford.

    FAQs

    How do I estimate chargeable weight for air freight?

    Estimate both the actual gross weight and the volumetric weight of your shipment. Air carriers bill based on whichever number is higher.

    For volumetric weight, use this formula:

    (length × width × height in centimeters) ÷ 6,000

    Then multiply the result by the number of packages.

    Before you ask for a quote, double-check each carton’s dimensions and weight. That small step can help you avoid billing adjustments later.

    When should I split a shipment between air and ocean?

    Split a shipment when you need to keep inventory available without letting shipping costs get out of hand. The idea is simple: move part of the order fast, and move the rest at a lower cost.

    A common play is to send a small share – say, 20% by air – so it arrives within 10 days, while the remaining 80% goes by ocean to keep per-unit costs down. This works well for urgent restocks and for peak-season planning, when timing matters but so does your budget.

    What extra fees should I budget beyond the freight rate?

    Beyond the base freight rate, plan for destination handling, customs duties and taxes, and brokerage fees unless your quote is all-inclusive.

    You’ll also want to factor in Amazon-related charges like FNSKU labeling, palletization, and possible long-term storage or inbound placement fees. On top of that, shipping insurance and professional packaging are optional, but they’re usually a smart call.

    The big thing is simple: confirm exactly what’s included in your quote so your landed cost lines up with what you expect.